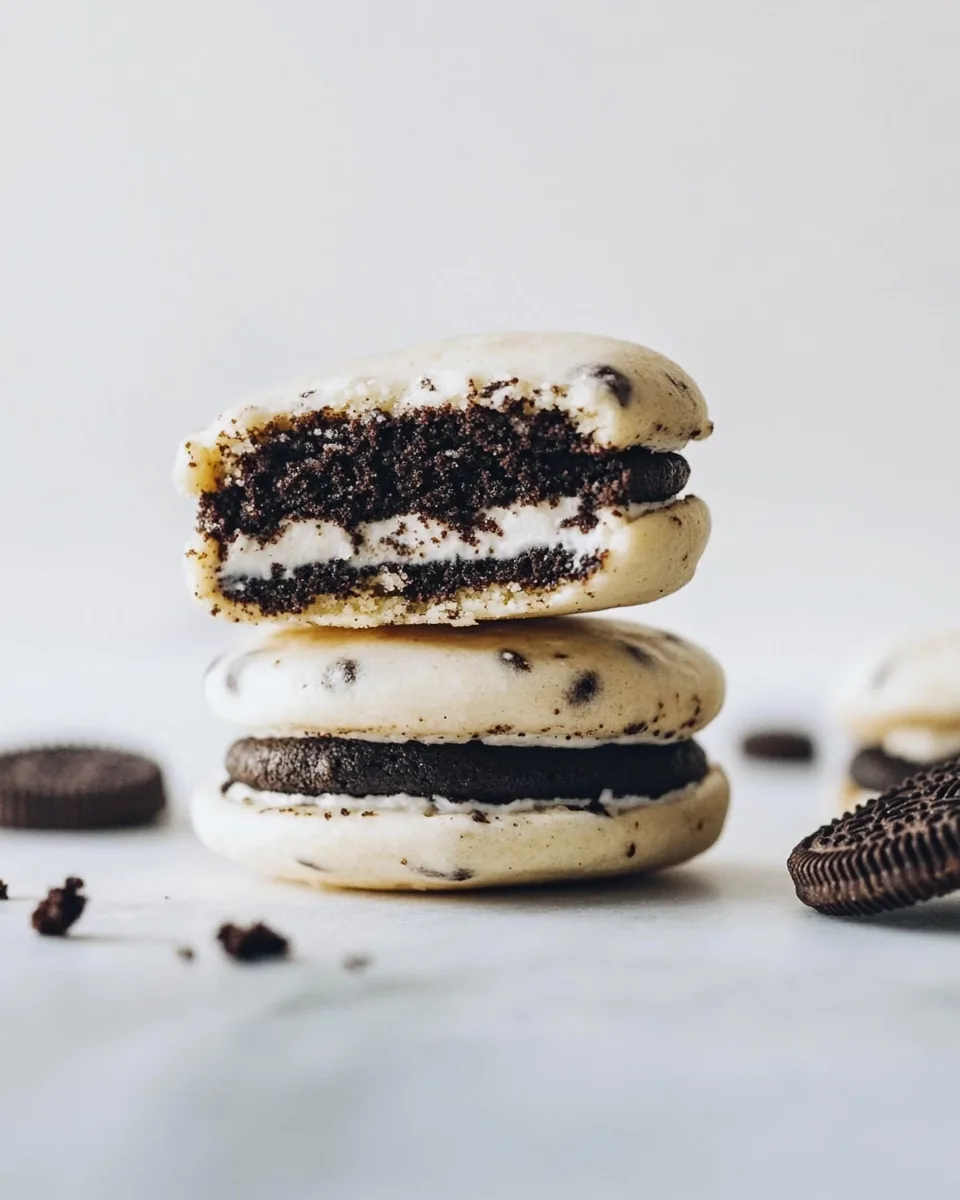
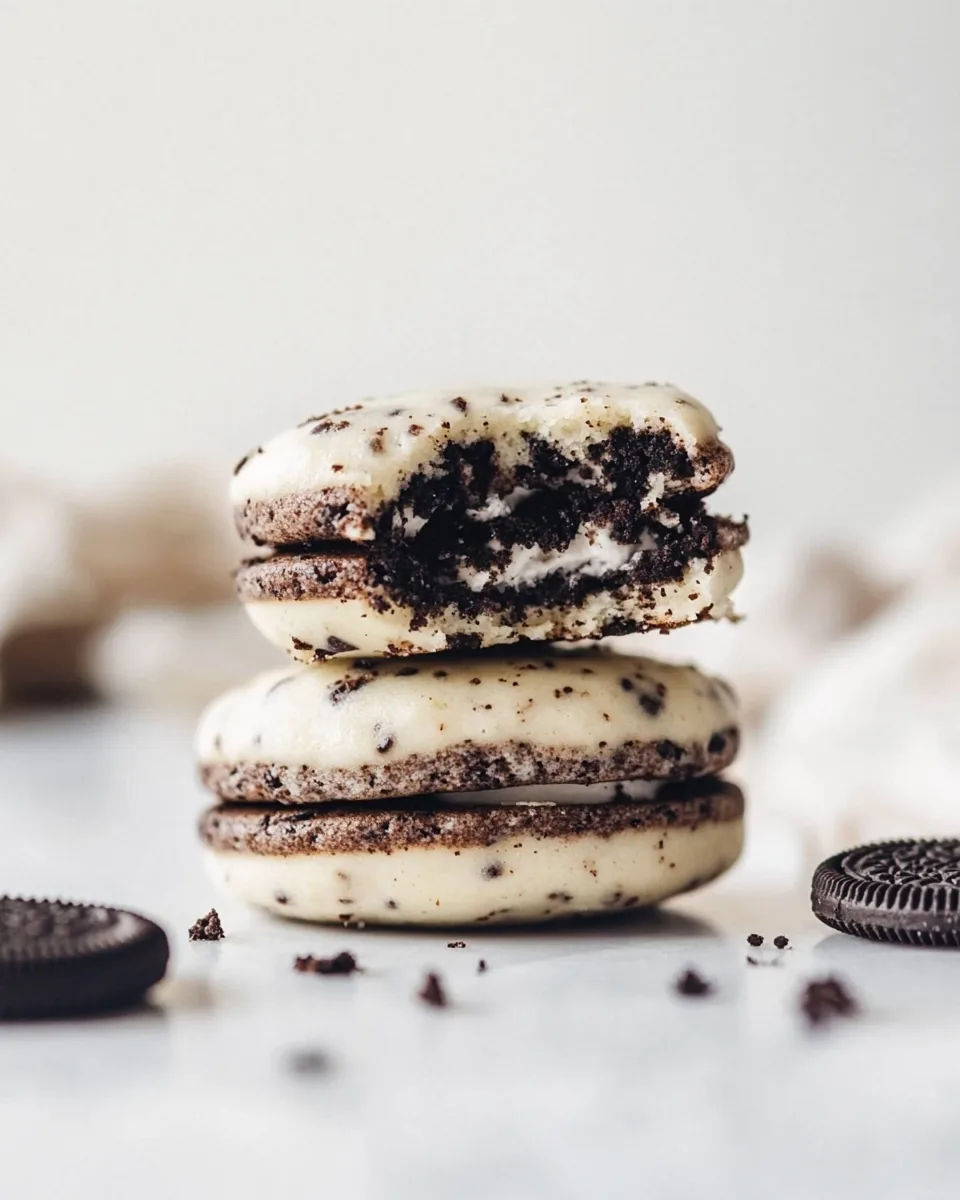
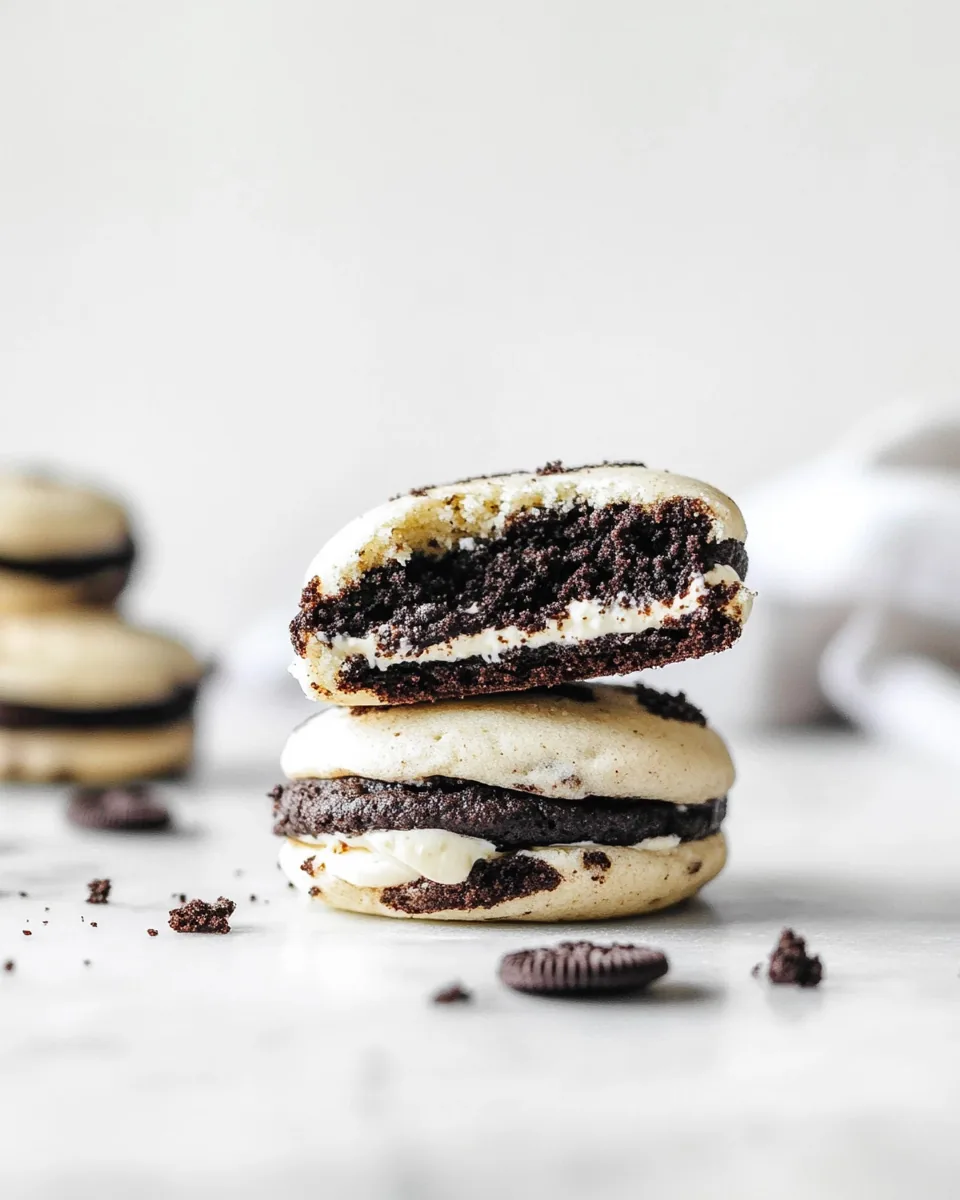
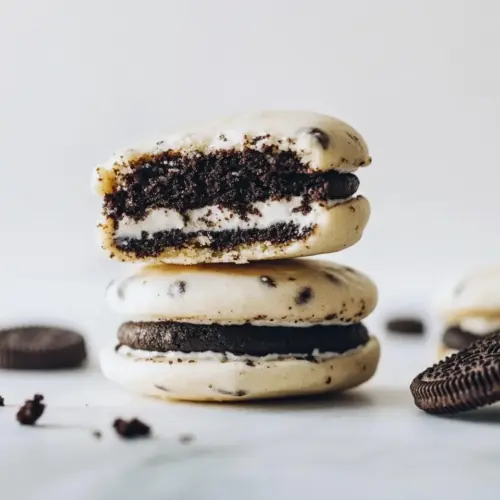
Oreo Whoopie Pies
Let me take you back to my childhood, when the sun would shine just right, and my mom would whip up a batch of Oreo Whoopie Pies for my friends and me. The aroma of freshly baked cookies wafting through the house was pure magic. It was one of those special treats that made every gathering feel like a celebration. With two soft, chewy cookies hugging a luscious cream filling, these whoopie pies were not just a dessert; they were a memory we all cherished. I can still hear the laughter as we raced to see who could eat them the fastest. Who knew that something so simple could bring so much joy?
Recipe Snapshot
25 mins
15 mins
10 mins
Medium
220 kcal
2 g
Vegan, Gluten-Free, AIP
10 g
Sheet pan (15″ x 10″), Parchment paper or liner, Stand mixer or hand mixer, Cooling rack
The Best Thing About This Oreo Whoopie Pies
1. Nostalgic Comfort
For many of us, Oreo Whoopie Pies are a nostalgic comfort food that takes us back to simpler times filled with laughter and love. Each bite is like a warm hug, reminding us of family gatherings and childhood delights. There’s something incredibly comforting about the combination of soft cookies paired with rich cream filling that just melts in your mouth.
2. Easy to Make
If you’re looking for a fun baking adventure, you’ll find that these whoopie pies are surprisingly easy to make! With just a handful of ingredients and straightforward steps, even novice bakers can impress friends and family without stress. Plus, the joy of mixing and creating something delicious is a wonderful way to spend an afternoon.
3. Perfect for Any Occasion
Whether you’re hosting a birthday party, a family picnic, or simply want to indulge in a sweet treat, Oreo Whoopie Pies fit the bill perfectly. They are versatile enough for any occasion, and their fun presentation makes them a hit with both kids and adults alike.
4. Customizable Creations
One of my favorite aspects of Oreo Whoopie Pies is the endless customization options! You can experiment with different flavors in the cookies and the filling. Want a chocolate cookie with peanut butter frosting? Go for it! The possibilities are as vast as your imagination.
5. A Crowd-Pleasing Treat
These whoopie pies are sure to be a crowd-pleaser whenever you serve them. The combination of flavors and textures captivates everyone’s taste buds. They also make great treats for friends and neighbors, ensuring that you’re the star of any bake sale or potluck!
6. Memories in Every Bite
Each Oreo Whoopie Pie is filled with personal stories and memories. As you share them with loved ones, you’re not just sharing a delicious treat; you’re sharing moments of happiness, laughter, and connection that will last a lifetime.
Ingredient List for Oreo Whoopie Pies
When it comes to crafting the perfect Oreo Whoopie Pies, each ingredient plays a vital role in creating that irresistible flavor and texture. The key players include the moist cake mix and the creamy filling that binds it all together. These ingredients work harmoniously to provide a delightful experience in every bite, ensuring your friends and family will keep coming back for more.
- 1 (14.25-ounce) package Betty Crocker Super Moist White Cake Mix: This cake mix is the foundation of our whoopie pies, providing a soft and fluffy texture that’s hard to resist.
- 1 (3.4-ounce) package instant vanilla pudding mix: Adding instant pudding mix enhances the moisture and richness of the cookies, making them decadently delicious.
- 2 large eggs: Eggs are essential for binding the ingredients together, creating a cohesive dough that holds its shape during baking.
- 8 tablespoons unsalted butter (1/2 cup, at room temp): The butter adds a rich flavor and contributes to the soft texture of the cookies.
- 1 teaspoon vanilla extract: Vanilla provides a warm, comforting flavor that elevates the overall taste of the whoopie pies.
- 1 cup finely chopped regular Oreos (about 9 cookies): These crunchy cookie bits add texture and that signature Oreo flavor that makes these pies irresistible.
- 8 tablespoons unsalted butter (1/2 cup, at room temp): Used again in the frosting, this butter is crucial for achieving a creamy, smooth filling.
- 1 (8-ounce) package cream cheese (full-fat, brick-style, softened): Cream cheese is the star of the frosting, lending a tangy richness that perfectly complements the sweetness of the cookies.
- 1 teaspoon vanilla extract: An additional splash of vanilla in the frosting brings all the flavors together in perfect harmony.
- 1/8 teaspoon salt: A pinch of salt amplifies the sweetness and balances the flavors in both the cookies and filling.
- 3 cups powdered sugar: This sweet ingredient is what makes the frosting luxuriously thick and gives it that enticing sweetness.
How to Cook Oreo Whoopie Pies
Creating Oreo Whoopie Pies is like embarking on a delightful baking adventure. Let’s dive into the process together! Follow these steps to make your own delicious treats that are perfect for any occasion.
- In a stand mixer (or using a large bowl and a hand mixer), combine the cake mix, pudding mix, butter, eggs, and vanilla. Mix until you achieve a very thick dough. Make sure to scrape the bowl as needed to incorporate all the ingredients effectively.
- Finely chop the whole Oreos (with the cream) and gently fold them into the dough. This adds a wonderful crunch and bursts of flavor in every bite!
- Using a food scale, roll about 1 and 1/2 tablespoons of dough into balls, approximately 30 grams each. Chill the balls in the refrigerator for 30 minutes to an hour. This helps keep them puffy during baking.
- Preheat your oven to 350°F (175°C). Line a sheet pan with parchment paper or a liner to prevent sticking. Place the chilled dough balls on the sheet pan, ensuring they are spaced about 2 inches apart.
- Bake the cookies for 9 to 10 minutes until the bottoms are slightly browned. Be careful not to overbake, as you want them to be soft and chewy.
- Once baked, let the cookies rest on the sheet for 5 minutes before transferring them to a cooling rack. This helps them set without breaking apart.
- For the frosting, soften the cream cheese in the microwave on a safe plate using 15 to 20-second bursts until room temperature. In a mixer, cream the butter and cream cheese together until smooth and creamy.
- Mix in the additional vanilla and salt. Gradually add the powdered sugar, beating until smooth. Start on low speed for about 30 seconds, then increase to medium-high speed and beat for 1 to 2 minutes until fluffy.
- For thicker frosting, you can add an extra 1/4 cup of powdered sugar if desired. Chill the frosting for 20 to 30 minutes to firm it up before frosting the cookies.
- Once the cookies are cool, transfer the frosting into a piping bag fitted with a wide tip. Pipe the frosting onto one cookie and gently sandwich it with another. Repeat this process with all the cookies.
- Cover the assembled Oreo Whoopie Pies with plastic wrap and refrigerate overnight. This allows the flavors to blend and the cookies to soften, making them even more delightful when served the next day!
- Before serving, let the pies come to room temperature to enhance their flavor. These whoopie pies are best enjoyed fresh!
Things Worth Knowing
- Chilling the dough: Chilling the dough helps maintain the shape of your cookies while they bake, resulting in thick and puffy whoopie pies.
- Baking time: Keep an eye on your cookies! They should be lightly browned on the bottom but still soft in the middle.
- Frosting consistency: For a thicker frosting, gradually add more powdered sugar until you reach your desired consistency.
- Storage: Store the whoopie pies in an airtight container in the fridge for up to 4 days to keep them fresh.
Variations to Try

If you’re feeling adventurous, there are plenty of exciting variations to explore with Oreo Whoopie Pies. Here are some fun ideas to inspire your next baking session:
- Mint Chocolate Chip: Add crushed mint chocolate candies to the cookie dough for a refreshing twist.
- Peanut Butter Cream: Swap the cream cheese frosting for a creamy peanut butter filling for a nutty delight.
- Chocolate Cookies: Use chocolate cake mix instead of white for a rich cookie experience.
- Stuffed Whoopie Pies: Add a layer of your favorite jam or fruit preserves between the frosting for a fruity surprise.
- Seasonal Flavors: Experiment with gingerbread or pumpkin spice for a seasonal treat during holidays.
- Gluten-Free: Look for gluten-free cake mix options to create a gluten-free version of this classic dessert.
- Frozen Treat: Freeze the assembled whoopie pies for a cool dessert on hot summer days.
Serving Options for Oreo Whoopie Pies
When it comes to serving Oreo Whoopie Pies, the options are as delightful as the treat itself! Here are some creative serving ideas:
- Gourmet Dessert Platter: Arrange a platter of whoopie pies alongside fresh fruit, chocolate-covered strawberries, and a scoop of ice cream for a dessert buffet.
- Birthday Celebrations: Serve them at birthday parties as a fun alternative to traditional cake, letting guests pick their favorite flavors.
- Picnic Treats: Pack them for picnics or outdoor gatherings; they are easy to transport and always a crowd favorite.
- Holiday Celebrations: Use festive decorations or seasonal flavors to serve them during special occasions like Christmas or Thanksgiving.
- Afternoon Tea: Pair with a cup of tea or coffee during afternoon tea, creating a cozy ambiance for relaxation and conversation.
- In the Freezer: Keep some in the freezer for impromptu gatherings or late-night cravings—just thaw and enjoy!
- With Milk: Don’t forget the classic pairing of whoopie pies with a glass of cold milk for a nostalgic touch.
FAQ
Conclusion
In conclusion, Oreo Whoopie Pies are more than just a dessert—they’re a celebration of flavors and memories. This delightful treat combines the delightful sweetness of cookies with a creamy filling, making it a favorite among many. I encourage you to give this recipe a try and experience the joy it brings. Whether you share them with loved ones or savor them alone, these whoopie pies are guaranteed to put a smile on your face!
Oreo Whoopie Pies
Equipment
- Sheet pan (15" x 10")
- Parchment paper or liner
- Stand mixer or hand mixer
- Cooling rack
Ingredients
- 1 package Betty Crocker Super Moist White Cake Mix 14.25-ounce
- 1 package instant vanilla pudding mix 3.4-ounce
- 2 large eggs
- 8 tablespoons unsalted butter 1/2 cup, at room temp
- 1 teaspoon vanilla extract
- 1 cup finely chopped regular Oreos about 9 cookies
- 8 tablespoons unsalted butter 1/2 cup, at room temp
- 1 package cream cheese full-fat, brick-style, softened
- 1 teaspoon vanilla extract
- 1/8 teaspoon salt
- 3 cups powdered sugar
Instructions
- In a stand mixer (or using a large bowl and a hand mixer), combine cake mix, pudding mix, butter, eggs, and vanilla. Mix until you achieve a very thick dough. Make sure to scrape the bowl as needed to incorporate all the ingredients effectively.
- Finely chop the whole Oreos (with the cream) and gently fold them into the dough. This adds a wonderful crunch and bursts of flavor in every bite!
- Using a food scale, roll about 1 and 1/2 tablespoons of dough into balls, approximately 30 grams each. Chill the balls in the refrigerator for 30 minutes to an hour. This helps keep them puffy during baking.
- Preheat your oven to 350°F (175°C). Line a sheet pan with parchment paper or a liner to prevent sticking. Place the chilled dough balls on the sheet pan, ensuring they are spaced about 2 inches apart.
- Bake the cookies for 9 to 10 minutes until the bottoms are slightly browned. Be careful not to overbake, as you want them to be soft and chewy.
- Once baked, let the cookies rest on the sheet for 5 minutes before transferring them to a cooling rack. This helps them set without breaking apart.
- For the frosting, soften the cream cheese in the microwave on a safe plate using 15 to 20-second bursts until room temperature. In a mixer, cream the butter and cream cheese together until smooth and creamy.
- Mix in the additional vanilla and salt. Gradually add the powdered sugar, beating until smooth. Start on low speed for about 30 seconds, then increase to medium-high speed and beat for 1 to 2 minutes until fluffy.
- For thicker frosting, you can add an extra 1/4 cup of powdered sugar if desired. Chill the frosting for 20 to 30 minutes to firm it up before frosting the cookies.
- Once the cookies are cool, transfer the frosting into a piping bag fitted with a wide tip. Pipe the frosting onto one cookie and gently sandwich it with another. Repeat this process with all the cookies.
- Cover the assembled Oreo Whoopie Pies with plastic wrap and refrigerate overnight. This allows the flavors to blend and the cookies to soften, making them even more delightful when served the next day!
- Before serving, let the pies come to room temperature to enhance their flavor. These whoopie pies are best enjoyed fresh!
Notes
- Tip 1: Be sure to use a 14.25-ounce box of cake mix for the best flavor and texture.
- Tip 2: Refrigerate the whoopie pies overnight to allow the flavors to develop and the cookies to soften.
- Tip 3: Store them in an airtight container in the fridge for up to 4 days.
- Tip 4: You can freeze the unbaked dough and bake straight from the freezer, just add an extra minute or two to the baking time.