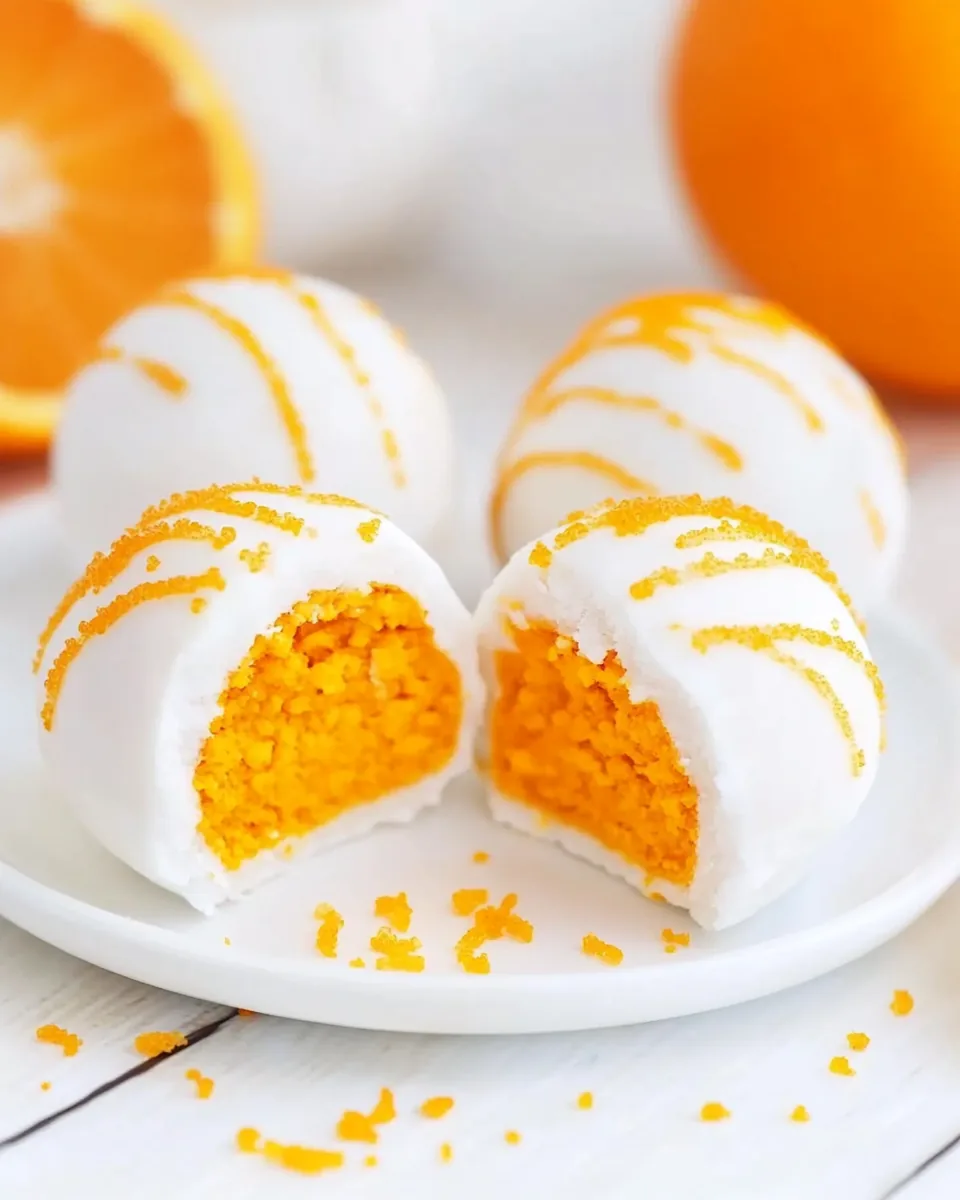
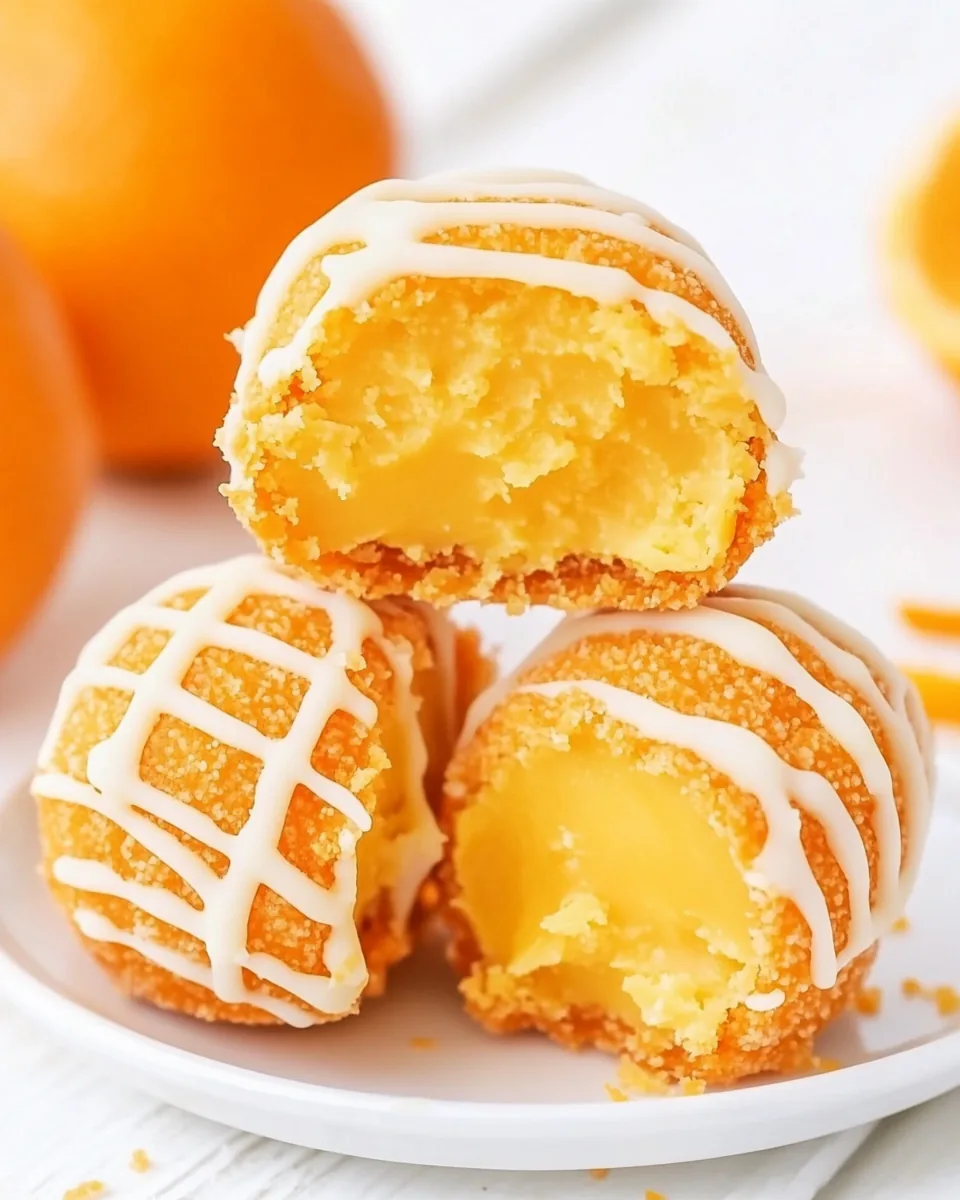
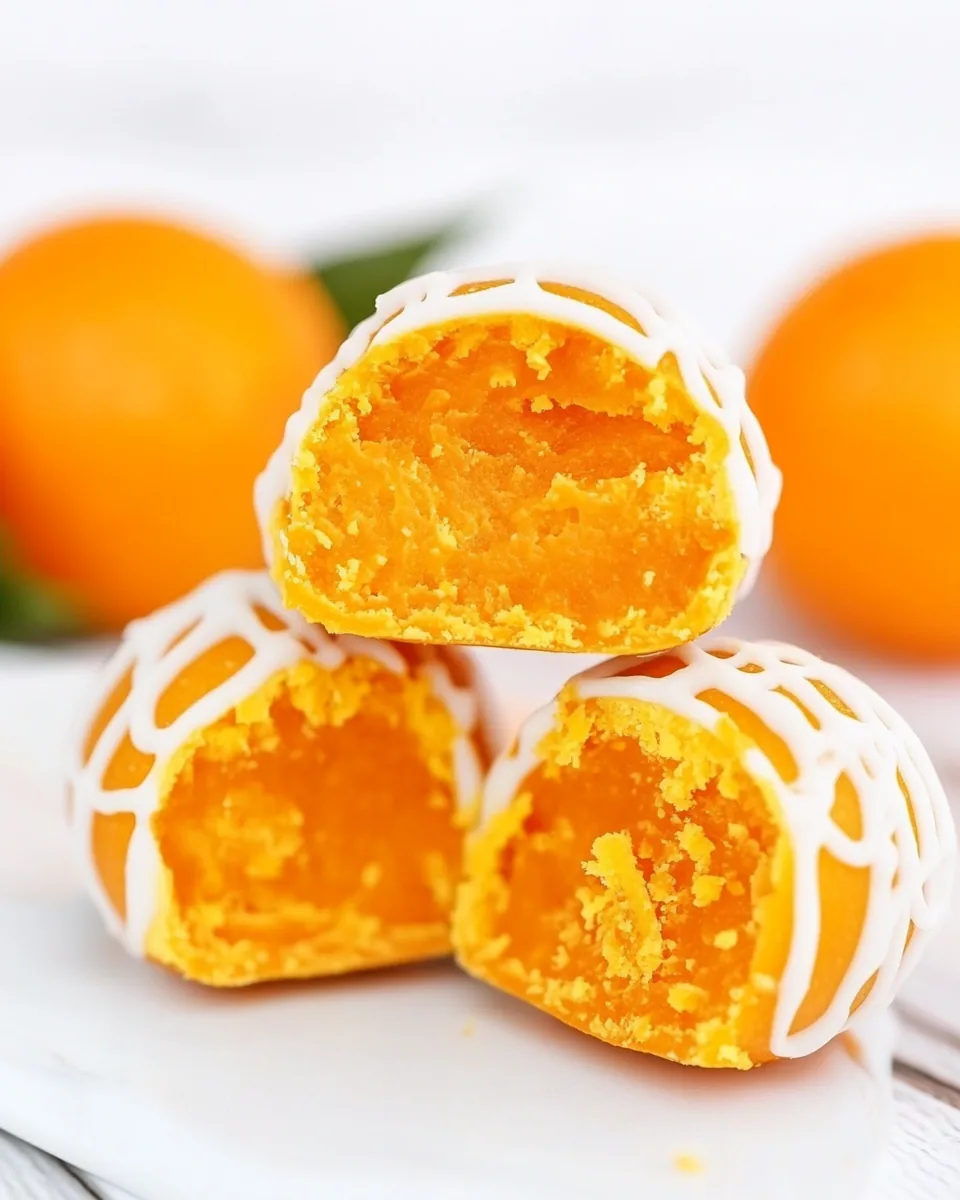
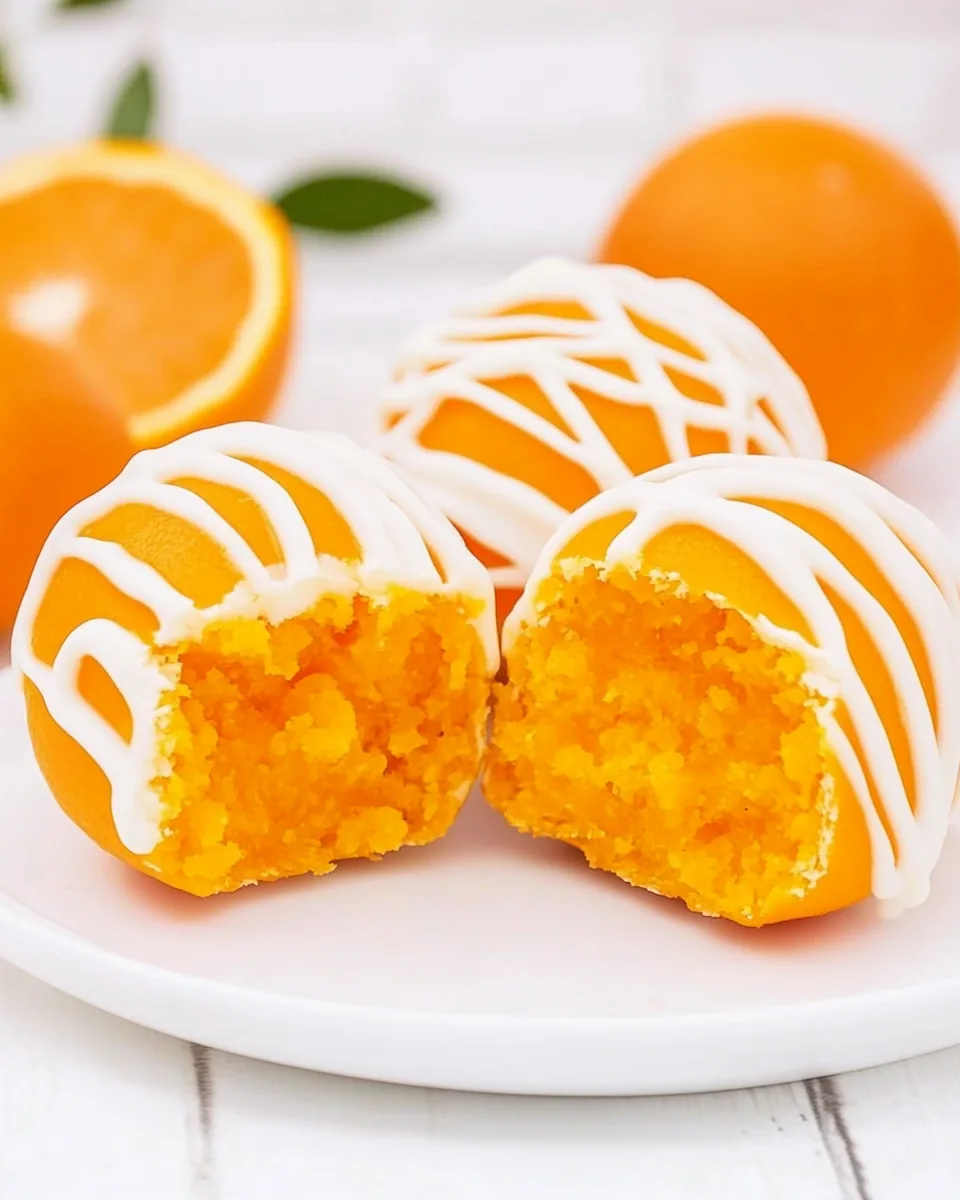
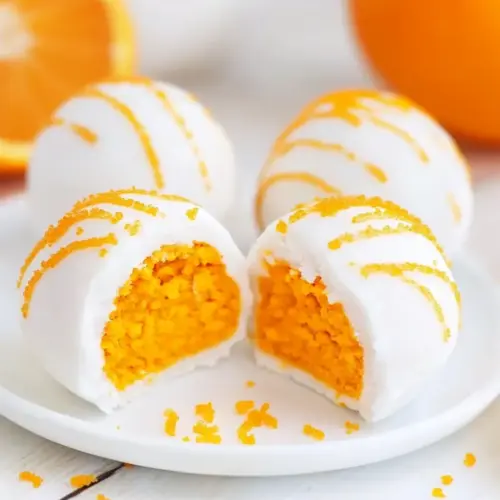
Orange Truffles
When I think of special treats, the first thing that comes to mind is my Orange Truffles. These delightful morsels aren’t just a visual treat; they pack a punch of flavor that’s simply irresistible. It all started when I was searching for a sweet something to bring to a family gathering. I wanted to impress everyone without spending hours in the kitchen. After some experimentation, I stumbled upon this recipe that combines the tangy zest of oranges with the creamy texture of cheesecake. It was an instant hit! With just a handful of ingredients and a little patience, I was able to create a batch of these luscious truffles that disappeared in no time.
Every time I make Orange Truffles, I’m reminded of the joy of sharing food with loved ones. The look on their faces when they take that first bite is priceless. The combinations of flavors are so unique, making these truffles perfect for any occasion, be it a birthday party, holiday gathering, or simply a sweet treat after dinner. Plus, they’re a fun project to get the kids involved in—who doesn’t love rolling dough into little balls coated in a sweet, colorful layer?
So, if you’re looking for a dessert that’s as delightful to make as it is to eat, I highly recommend giving Orange Truffles a try. Trust me, they’ll become a staple in your dessert repertoire!
Recipe Snapshot
10 mins
10 mins
0 mins
Medium
150 kcal
2 g
Keto, Gluten-Free, Low FODMAP
7 g
Wooden Spoon, Mixing Bowl
The Best Thing About This Orange Truffles
Quick and Easy
One of the best aspects of Orange Truffles is how incredibly simple they are to make. With just a few ingredients, you can whip up a batch in no time. This makes it a perfect choice for last-minute gatherings or when you have a sudden craving for something sweet.
Deliciously Versatile
You can easily tweak the flavors to your liking. Whether it’s adding more zest for a tangy kick or experimenting with different coatings, the options are endless! Each batch can taste a little different, and who doesn’t love a little variety?
A Crowd-Pleaser
I’ve served these Orange Truffles at numerous gatherings, and they’re always the first to go. Friends and family rave about their unique flavor and creamy texture. They truly impress, making you look like a culinary genius without requiring much effort.
Perfect for Any Occasion
Whether you’re celebrating a birthday, holiday, or just want a sweet treat, these truffles are adaptable for any occasion. They can be dressed up for a fancy event or served casually for a family movie night.
Fun Activity
Making Orange Truffles is not just about the end result; it’s a fun activity you can do with anyone, including kids. Rolling the truffles and decorating them adds an element of creativity and joy to the kitchen.
Everything You Need for Orange Truffles
When it comes to making delicious Orange Truffles, the choice of ingredients is crucial. Each component plays a vital role in creating the perfect balance of flavors and textures. From the tangy orange cake mix to the rich cream cheese, these ingredients work together beautifully to create a delightful dessert experience.
- 15.25 ounces Orange Cake Mix: This forms the base of your truffles, providing a moist, flavorful foundation with a hint of orange zest that makes every bite refreshing.
- 8 ounces Cream Cheese: The cream cheese adds a rich, creamy texture to the truffles, making them decadent and indulgent. Make sure it’s at room temperature for smooth mixing.
- 12 ounces Orange Candy Melts: These melts provide a vibrant coating that not only looks appealing but also enhances the orange flavor, creating a beautiful finish for your truffles.
- 4 ounces White Vanilla Almond Bark: This is used for drizzling over the coated truffles, adding an extra layer of sweetness and a delightful visual appeal.
Instructions for Orange Truffles
Making Orange Truffles is a fun and rewarding experience. Follow these detailed steps to create your own delicious truffles that everyone will adore.
- Before adding the orange cake mix, it’s important to heat treat it. Pour the dry orange cake mix into a medium-sized heat-safe bowl. Microwave the cake mix in two 30-second intervals, stirring well after each interval. This step eliminates any potential bacteria in the raw mix. Allow it to cool completely before mixing.
- In a separate medium-sized mixing bowl, take your cream cheese and beat it with a handheld mixer on medium-high speed for about 2 to 2½ minutes. You want it to be completely smooth and creamy, with no lumps remaining, ensuring a perfect truffle texture.
- Once your cream cheese is ready, sprinkle the cooled orange cake mix over the top. Carefully mix them together, taking care to combine them just until the cake mix is fully incorporated. Over-mixing can lead to a dense texture.
- After mixing, tightly cover the bowl with plastic wrap or a lid and chill the mixture in the refrigerator for about 2 hours. This chilling time helps the mixture firm up, making it easier to scoop and roll into balls.
- While the mixture is chilling, line a baking sheet with parchment paper and set it aside. This will be where you place your rolled truffles.
- After the chilling period, use a 1 tablespoon cookie scoop to portion out the mixture. Roll each portion into a ball with your hands, then place them onto the prepared baking sheet. Try to work quickly to keep them from warming up too much.
- Now, it’s time to melt the orange candy melts. Using a medium-sized heat-safe bowl, heat the melts in the microwave in 30-second intervals, stirring after each interval until completely melted. The melts should be smooth and easy to work with.
- Dip each cheesecake ball into the melted orange candy melts, ensuring they are fully coated. Use a fork to lift them out and gently tap off any excess coating before placing them back onto the baking sheet.
- Once coated, return the truffles to the refrigerator for a short time to set the coating. It helps to keep them cool and ensures a nice firm outer layer.
- In another heat-safe bowl, melt the white vanilla almond bark in the microwave, again in 30-second intervals until smooth. Using a spoon or small dipper, drizzle thin ribbons of the melted bark over the coated truffles for a beautiful finishing touch.
- After drizzling, return the finished truffles to the refrigerator until you’re ready to serve. Enjoy your homemade Orange Truffles with family and friends!
Things Worth Knowing
- Heat Treating the Cake Mix: This is crucial to eliminate any bacteria found in raw flour. It ensures safe consumption and a better texture.
- Room Temperature Ingredients: Using room temperature cream cheese helps in achieving a smooth mixture without lumps.
- Cooling Time: Allowing the mixture to chill is essential for easy handling while rolling into balls.
- Perfect Coating: The melted candy coating should be smooth; if it thickens, reheating it in the microwave can help restore its pourable consistency.
Ways to Adapt This Recipe
There are many creative ways to make Orange Truffles your own. Here are some tips to personalize your truffle-making experience.
- Storage: Keep any leftover truffles in an airtight container in the refrigerator. They stay fresh for up to a week.
- Freezing: You can freeze the uncoated cheesecake balls for later use. Just make sure to thaw them properly before coating.
- Flavor Variations: Experiment with different flavored cake mixes or candy melts, such as lemon or strawberry, for unique taste sensations.
- Decorative Toppings: Consider topping with crushed nuts, sprinkles, or even edible glitter for a festive touch.
- Make Them Mini: For bite-sized treats, use a smaller scoop to create mini versions of these truffles—perfect for parties!
What Complements This Orange Truffles
When it comes to serving Orange Truffles, there are plenty of delightful options. Here are some ideas to enhance your dessert experience:
- Pair with Fresh Fruit: Serve alongside fresh berries or citrus slices to balance the sweetness of the truffles.
- Great for Parties: These truffles are perfect for holiday parties, birthdays, or even casual get-togethers.
- Presentation: Consider placing the truffles in decorative cupcake liners for a beautiful display on dessert tables.
- Seasonal Treat: These truffles are especially popular in the spring and summer months due to their refreshing orange flavor.
- Hot Beverages: Pair with a cup of coffee, hot cocoa, or tea for a cozy dessert experience.
- Gift Giving: Package the truffles in a cute box or jar for a thoughtful homemade gift.
FAQ
Conclusion
Orange Truffles are a delightful combination of creamy and tangy flavors that make them a favorite dessert choice. These truffles are perfect for sharing with family and friends, making occasions even more special. I encourage you to give this recipe a try—you won’t be disappointed! With their bright color and delicious taste, they are sure to become a beloved treat in your home. Enjoy the process of making and indulging in these tasty bites!
Orange Truffles
Equipment
- Wooden Spoon
- Mixing Bowl
Ingredients
- 15.25 ounces Orange Cake Mix I used Duncan Hines Perfectly Moist brand.
- 8 ounces Cream Cheese Room temperature.
- 12 ounces Orange Candy Melts
- 4 ounces White Vanilla Almond Bark
Instructions
- Before adding the cake mix, it is important to heat treat the dry cake mix. Pour the dry cake mix into a medium-sized heat-safe bowl. Microwave the cake mix in two 30-second intervals, stirring after each interval. Allow the cake mix to cool completely before mixing it into the cream cheese.
- Using a medium-sized mixing bowl and a handheld mixer on medium-high speed, beat the cream cheese for 2 to 2½ minutes until completely smooth.
- Sprinkle the dry cake mix over the top of the cream cheese. Continue mixing just until the dry cake mix is completely incorporated.
- Tightly cover the cream cheese mixture and chill in the refrigerator for 2 hours.
- Line a baking sheet with parchment paper. Set it aside.
- Using a 1 tablespoon cookie scoop, scoop the cheesecake dough. Roll into a ball and set the cheesecake bites onto the prepared baking sheet. Repeat the steps.
- Using a heat-safe medium-sized mixing bowl, heat the candy wafer melts in 30-second intervals, stirring after each interval, until completely melted.
- Roll the cheesecake bites in the melted candy wafers. Place the coated cheesecake bites on a fork and gently tap any excess coating off.
- Return the coated cheesecake bites to the prepared baking sheet.
- Using a small heat-safe mixing bowl, microwave the white almond bark in 30-second intervals, stirring well after each interval.
- Using a spoon or small dipper, drizzle thin ribbons of the melted almond bark over the coated cheesecake bites.
- Once all the cheesecake bites are completely coated and drizzled, return them to the refrigerator until ready to serve.
Notes
- Tip 1: Make sure the cream cheese is at room temperature to avoid lumps in the cheesecake bites.
- Tip 2: You can allow the uncoated cheesecake bites to sit overnight in the refrigerator before the next step.
- Tip 3: If the coating becomes too thick, you can reheat it in the microwave in 15-second intervals, stirring well after each interval until smooth.
- Tip 4: You can place the melted almond bark in a small piping bag or sandwich bag and snip the corner to drizzle the almond bark if you want more control of the drizzle.