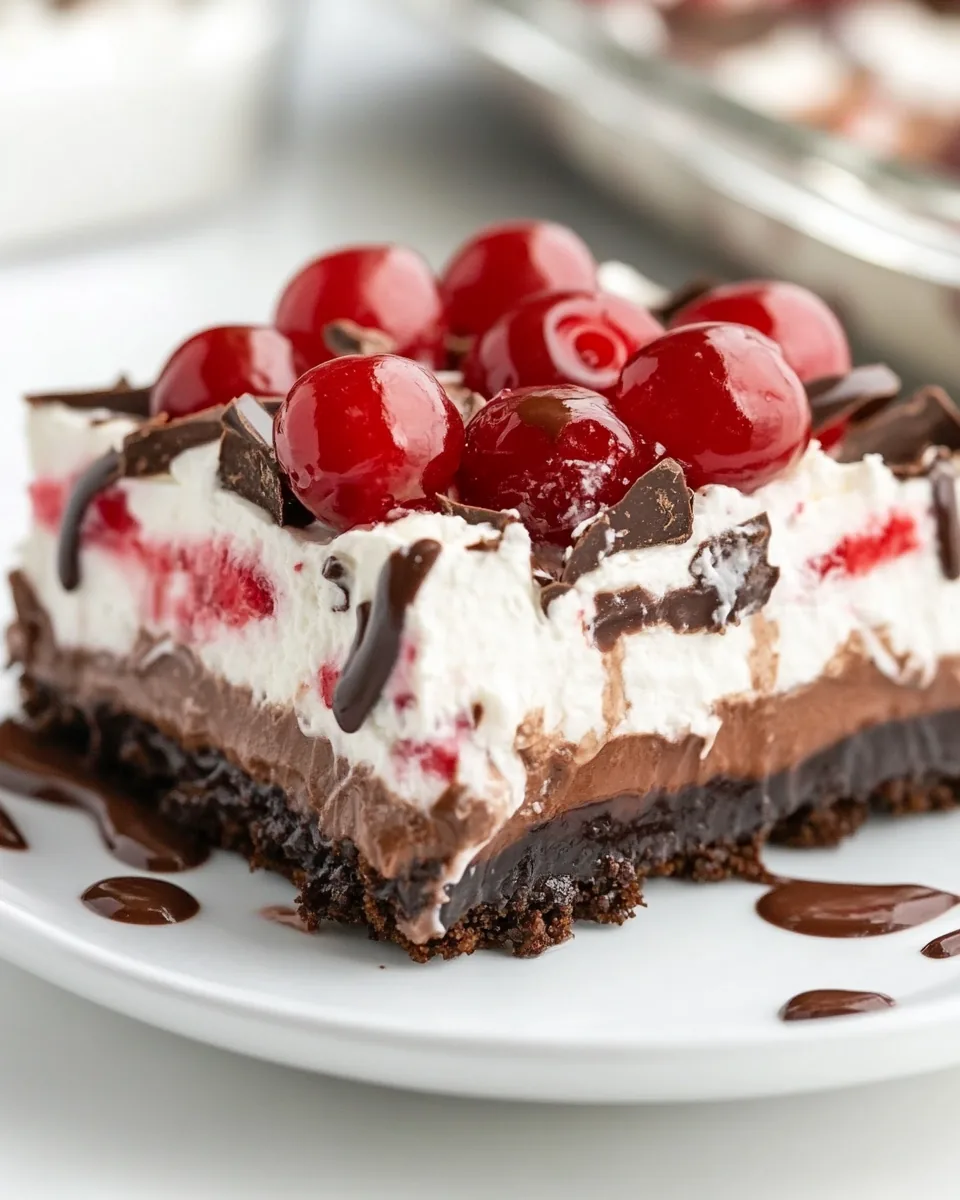
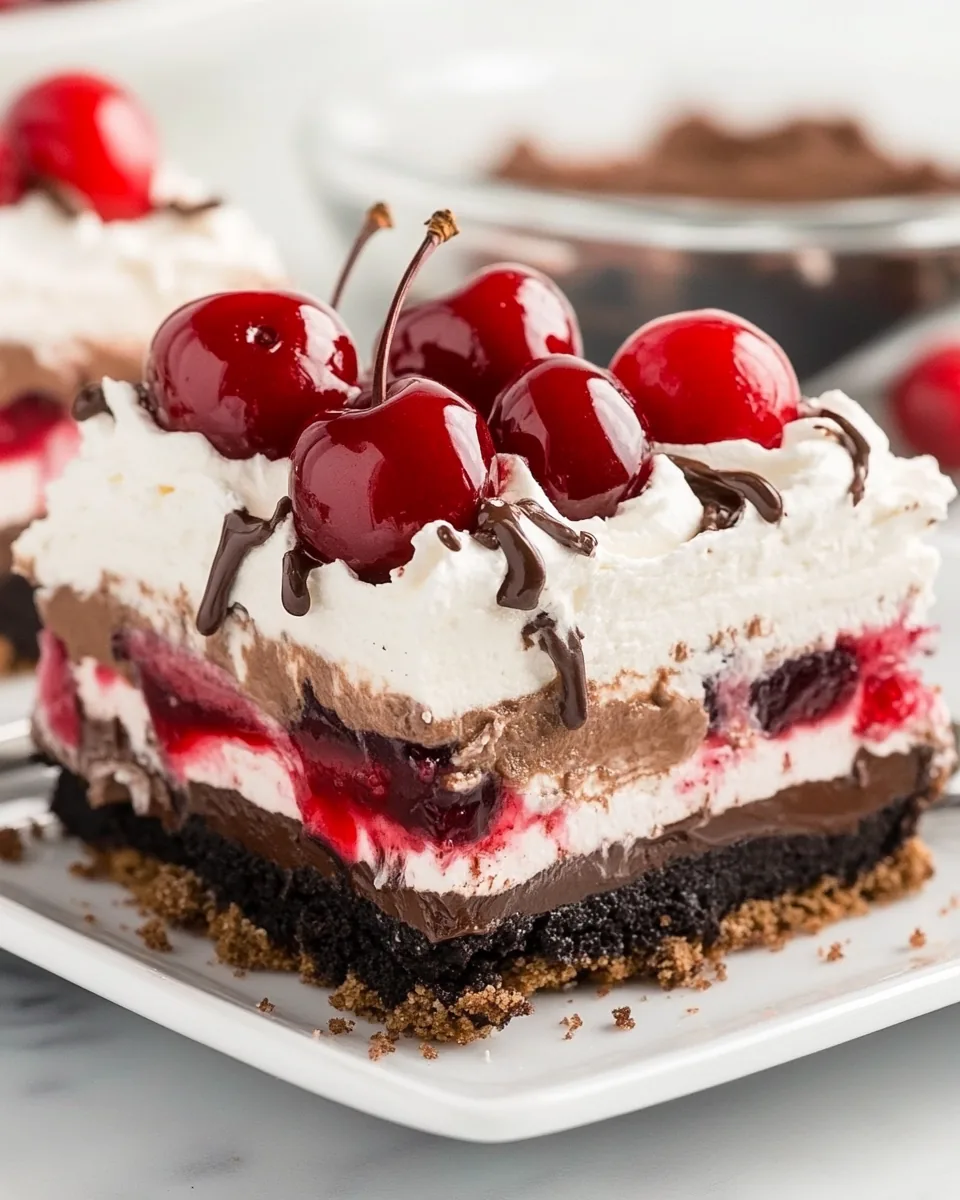
No Bake Chocolate Cherry Lush
There’s something magical about summer gatherings, and nothing embodies that spirit quite like No Bake Chocolate Cherry Lush. I remember the first time I made this dessert for a potluck; friends and family gathered around, their eyes lighting up at the sight of this layered delight. Each layer tells a story: the crunchy base made from chocolate sandwich cookies, the creamy cream cheese filling, and the luscious cherry pie filling that adds a burst of flavor. As I served it up, I could hear the delighted gasps and laughter that filled the air, making it a memory I cherish. This recipe is perfect for those warm sunny days when turning on the oven feels like a chore. Instead, we’re going no-bake, keeping things cool and effortless. Not only does it taste divine, but it’s also a breeze to whip up. Trust me, once you try No Bake Chocolate Cherry Lush, it’ll become your go-to dessert for any occasion!
Recipe Snapshot
20 mins
20 mins
0 mins
Medium
350 kcal
4 g
Gluten-Free, Low FODMAP
18 g
Food Processor, Mixing Bowl, Frying Pan
Why You Need This No Bake Chocolate Cherry Lush
There are countless reasons to fall in love with No Bake Chocolate Cherry Lush. Let me share a few that stand out the most:
1. Effortless Preparation
One of my favorite aspects of this dessert is how easy it is to prepare. You won’t need to spend hours in the kitchen; instead, you can enjoy more time with your loved ones. Just mix, layer, and chill! It’s perfect for busy days or impromptu gatherings.
2. Irresistible Layers
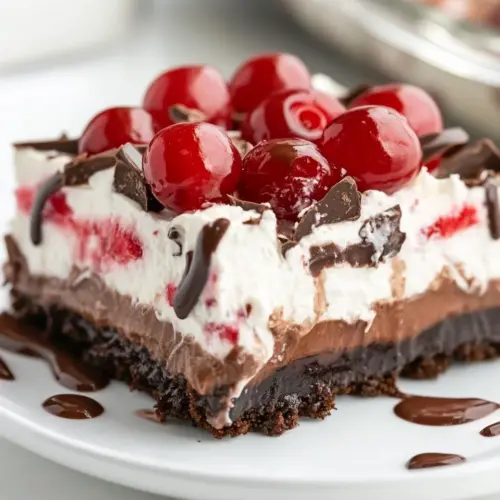
The beauty of No Bake Chocolate Cherry Lush lies in its layers. Each bite offers a delightful mix of textures and flavors, from the crunchy crust to the creamy filling topped with sweet cherries. It’s a dessert that visually captivates, but it’s the taste that leaves a lasting impression.
3. Versatile and Flexible
This dessert is incredibly versatile. You can easily customize the flavors to your liking. Want to switch the cherries for strawberries? Go for it! Feel like adding a layer of peanut butter? Absolutely! The possibilities are endless, making it adaptable for any palate.
4. Perfect for Any Occasion
Whether it’s a summer barbecue, a holiday celebration, or a simple family dinner, No Bake Chocolate Cherry Lush is the ideal dessert. It caters to both casual and special occasions, ensuring you always have a crowd-pleaser on hand.
5. A Sweet Way to Impress
Don’t be surprised if everyone asks for the recipe once they taste this delicious creation. It’s easy to make, beautiful to present, and utterly delightful to eat. You’ll be the star of the gathering!
6. No Cooking Required
As the name suggests, this dessert requires no baking. On hot days, this is a lifesaver as you can create something delicious without heating up your kitchen. Just layer the ingredients and let your refrigerator do the magic!
Ingredient List for No Bake Chocolate Cherry Lush
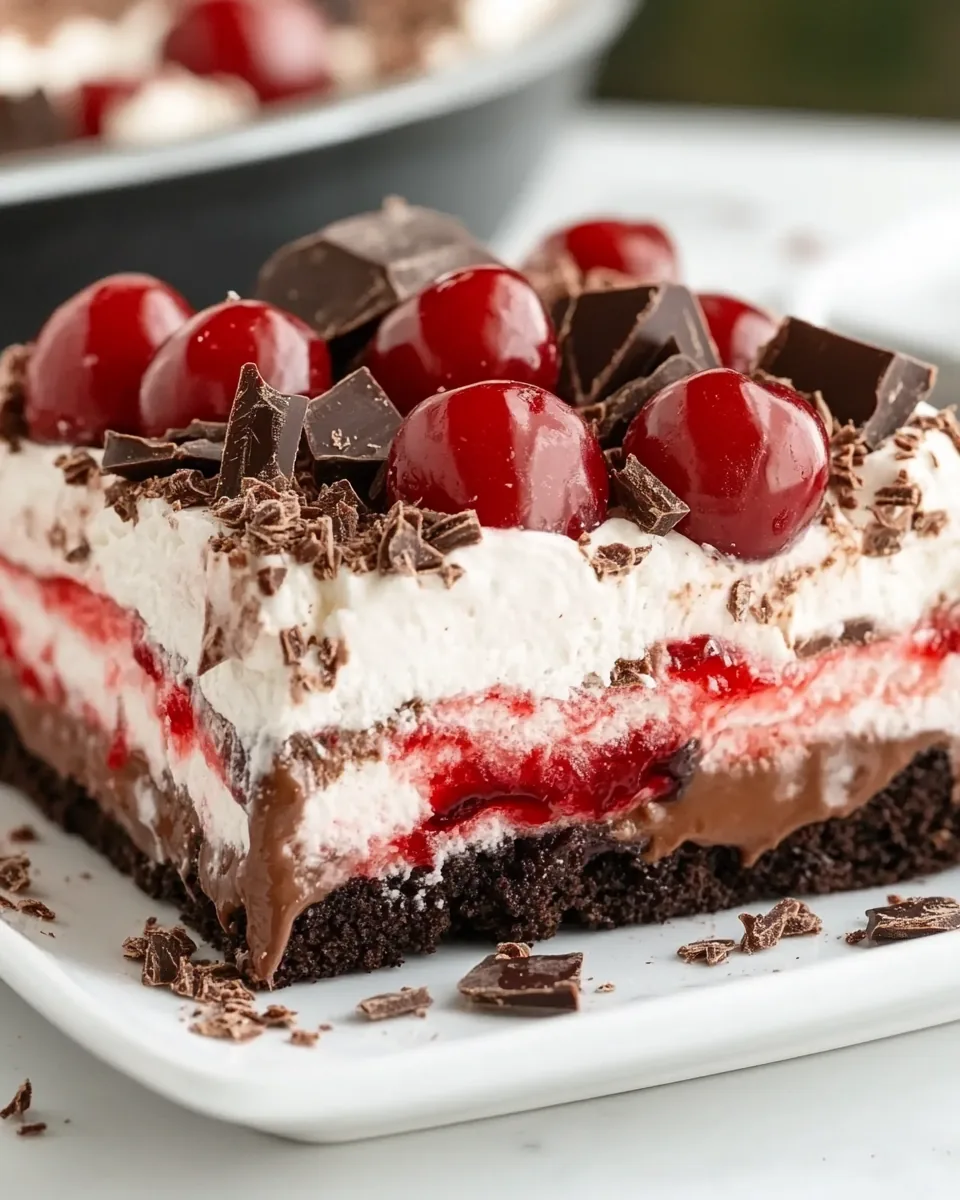
The ingredients for No Bake Chocolate Cherry Lush come together to create a perfect balance of flavors and textures. The key players here include chocolate sandwich cookies for the crust, cream cheese for that rich, creamy filling, and cherry pie filling to top it all off. Each ingredient plays a critical role and complements the others beautifully.
- 14.3 ounces chocolate sandwich cookies (approximately 36 cookies): These cookies form the crunchy base of our dessert, providing a rich chocolate flavor that pairs beautifully with the creamy filling.
- ⅓ cup salted butter, melted (plus more for greasing the pan): This binds the cookie crumbs together and adds richness to the crust.
- 16 ounces cream cheese (softened): Cream cheese gives our dessert its luscious texture and creamy flavor.
- 1 cup powdered sugar: This adds sweetness and helps to create a smooth filling.
- ¼ cup unsweetened cocoa powder: Deepens the chocolate flavor of the filling.
- 1 teaspoon vanilla extract: Enhances the overall flavor and adds a touch of warmth.
- ½ cup half & half: Adds creaminess to the filling. You can substitute with ⅓ cup whole milk if needed.
- 42 ounces cherry pie filling: The star of the dessert! This fruity topping brings a sweet tang and vibrant color.
- 16 ounces frozen whipped topping (Cool Whip, thawed): Makes the dessert light and fluffy while adding sweetness.
- Chocolate sprinkles (optional): Adds a decorative touch and extra chocolate flavor.
- 16 maraschino cherries (optional): These sweet cherries on top add a classic finishing touch.
Instructions for No Bake Chocolate Cherry Lush
Making No Bake Chocolate Cherry Lush is a delightful journey of layers. I love breaking down each step to ensure you get the perfect result. Let’s dive into the detailed instructions!
- Start by greasing a 9×13-inch glass baking dish with some butter. This ensures your dessert won’t stick, allowing for easy serving later.
- In the bowl of a food processor, add the chocolate sandwich cookies and pulse until they turn into small, even crumbs. This should take just a few seconds!
- Next, pour in the melted butter into the cookie crumbs. Pulse the mixture again until everything is well combined.
- Now, take the crust mixture and press it firmly into the bottom of the prepared baking dish. Make sure it’s even and compact for a sturdy base. Place the dish in the freezer to chill while we prepare the next layer.
- In a large mixing bowl, beat together the cream cheese, powdered sugar, cocoa powder, vanilla extract, and half & half using a hand mixer. Beat until the mixture is smooth and fluffy, which should take a few minutes.
- Now it’s time to spread the chocolate cheesecake layer over the chilled crust. Use a spatula to gently spread it evenly across the crust, making sure to cover it completely.
- Next, take your cherry pie filling and carefully spread it evenly over the cheesecake layer. If you notice that the cheesecake layer is too soft, it’s okay to chill the dish in the freezer for around 15 minutes to help firm it up a bit before adding the cherries.
- Once the cherry filling is on, top with the Cool Whip, reserving about a cup if you wish to pipe swirls on top later. Spread it smoothly across the cherries.
- For that extra touch, sprinkle chocolate sprinkles on top of the Cool Whip for decoration.
- If you want to add some flair, use a piping bag and a tip to pipe soft swirls of the reserved Cool Whip on top of the lush.
- Finally, place your masterpiece in the freezer to firm up for at least 2 hours. This will help all the layers set nicely.
- Before serving, gently place a maraschino cherry on top of each piped swirl for a classic touch!
- Cut into pieces and serve chilled, enjoying the delightful layers!
Things Worth Knowing
- Chilling is Key: Make sure to chill the dessert adequately for the layers to firm up. This helps in achieving clean cuts when serving.
- Room Temperature Cream Cheese: Ensure your cream cheese is at room temperature to prevent lumps in the mixture.
- Layering Technique: Take your time when spreading each layer to keep the dessert looking beautiful and ensure even flavor distribution.
- Mixing Tips: When using a hand mixer, start on a low speed to prevent splattering, then increase as the mixture thickens.
How to Switch It Up

If you’re feeling adventurous, here are some fun ways to switch up your No Bake Chocolate Cherry Lush experience:
- Flavor Variation: Try swapping the cherry pie filling for other fruit fillings like blueberry or raspberry for a fresh twist!
- Cookie Crust: Instead of chocolate sandwich cookies, experiment with Graham crackers or even vanilla wafers for a different base flavor.
- Drizzle: Add a drizzle of chocolate sauce or caramel sauce on top before serving for added sweetness and visual appeal.
- Nutty Crunch: Incorporate chopped nuts like walnuts or pecans into the crust for an added crunch and depth of flavor.
- Presentation: Layer the ingredients in individual cups for a beautiful presentation, making them perfect for parties!
- Vegan Version: Consider using non-dairy cream cheese and whipped topping for a dairy-free alternative!
Serving Suggestions
When it comes to serving No Bake Chocolate Cherry Lush, the options are plentiful. Here are some delightful ideas:
- Summer Gatherings: This dessert is perfect for summer barbecues or picnics. It’s refreshing, light, and doesn’t require any baking.
- Special Celebrations: Whether it’s a birthday, anniversary, or holiday, No Bake Chocolate Cherry Lush enhances every occasion with its vibrant colors and flavors.
- Pairing Options: Serve it alongside a scoop of vanilla ice cream or a fresh fruit salad for a balanced meal.
- Storage: Leftovers can be stored in the refrigerator for up to three days. Just cover it well to keep it fresh.
- Individual Servings: For a unique touch, serve in small dessert cups, garnishing each with a maraschino cherry.
- Seasonal Adaptations: Feel free to adapt the toppings based on seasonal fruits for variety throughout the year.
FAQ
Conclusion
What makes No Bake Chocolate Cherry Lush so special is its delightful combination of flavors and effortless preparation. It’s a dessert that brings joy and satisfaction to every gathering without keeping you stuck in the kitchen for hours. I encourage you to give it a try for your next event or even as a sweet treat for yourself. You won’t be disappointed, and your taste buds will thank you!
No Bake Chocolate Cherry Lush
Equipment
- Food Processor
- Mixing Bowl
- Frying Pan
Ingredients
- 14.3 ounces chocolate sandwich cookies approximately 36 cookies
- ⅓ cup salted butter melted (plus more for greasing the pan)
- 16 ounces cream cheese softened
- 1 cup powdered sugar
- ¼ cup unsweetened cocoa powder
- 1 teaspoon vanilla extract
- ½ cup half & half ⅓ cup whole milk can be substituted
- 42 ounces cherry pie filling
- 16 ounces frozen whipped topping Cool Whip (thawed)
- chocolate sprinkles optional
- 16 maraschino cherries optional
Instructions
- Grease a 9×13-inch glass baking dish with butter and set aside.
- In the bowl of a food processor, pulverize the Oreo cookies until small even crumbs form. Add the melted butter to the cookie crumbs and pulse until combined.
- Press the crust mixture into the prepared baking dish and place it in the freezer to chill while preparing the next layer.
- With a hand mixer, beat together cream cheese, powdered sugar, cocoa powder, vanilla extract, and the cream. Continue beating until the mixture is smooth and fluffy.
- Spread the chocolate cheesecake layer over the chilled crust.
- Use a spatula to carefully spread the cherry pie filling evenly over the cheesecake layer (if the cheesecake layer appears too soft, you can chill the dish in the freezer for 15 minutes or so between each layer to help firm up the surface.
- Top with the Cool Whip, reserving about a cup to pipe swirls on top of the lush if you wish.
- Spread the Cool Whip smooth. Sprinkle with chocolate sprinkles.
- Use a piping bag and tip #1M to pipe soft swirls of Cool Whip on top of the lush.
- Place the lush in the freezer to firm up for at least 2 hours.
- Gently place a cherry on top of each piped swirl.
- Cut into pieces and serve.
Notes
- Tip 1: Make sure your cream cheese is at room temperature; otherwise, you will end up with lumps in your mixture.
- Tip 2: If the cheesecake layer appears too soft, you can chill the dish in the freezer for 15 minutes between each layer to help firm up the surface.
- Tip 3: Chilling even longer, or overnight, would allow all the flavors to mingle and blend together even more!