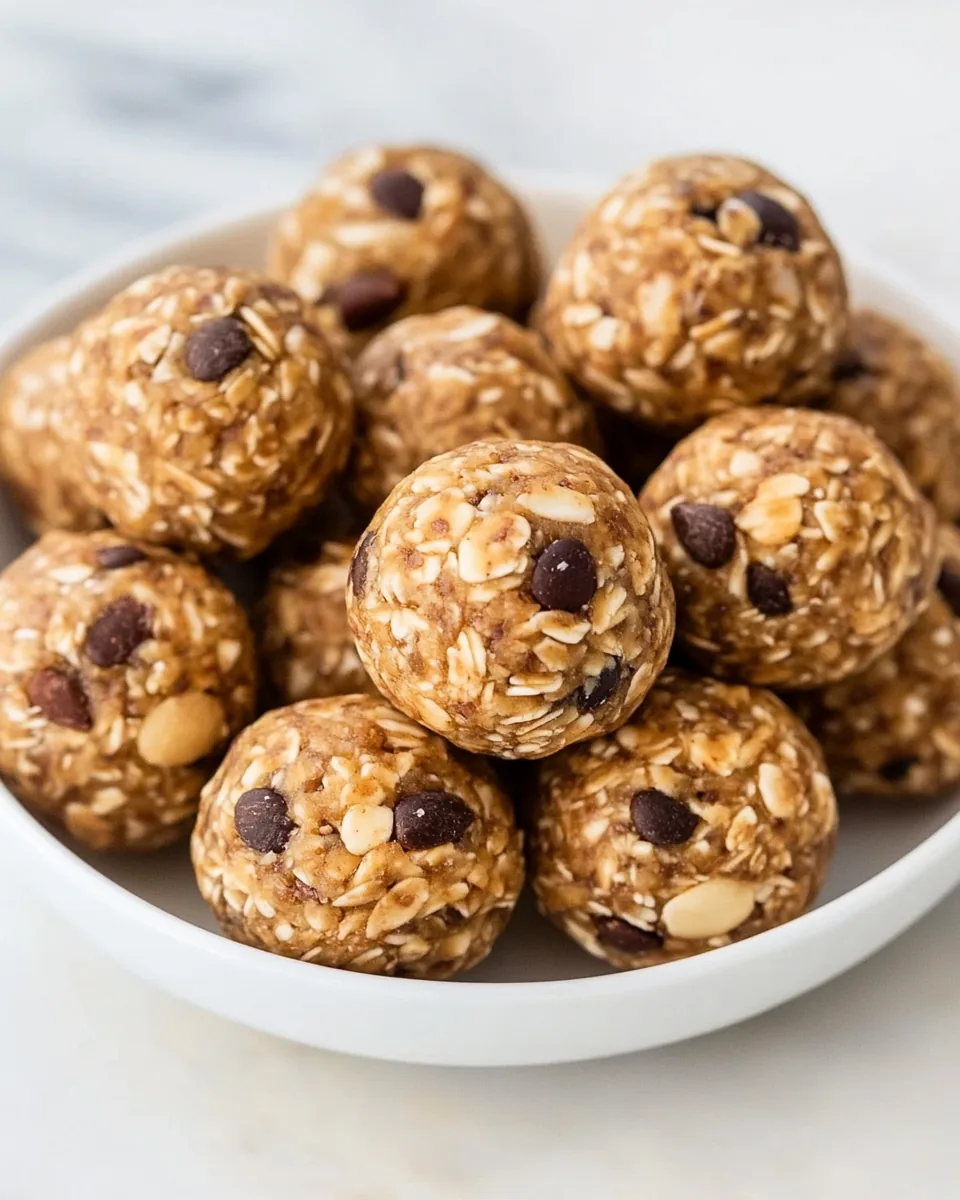
No Bake Almond Energy Balls
For those busy days when you need a quick energy boost, there’s nothing quite like the satisfaction of making No Bake Almond Energy Balls. I still remember the first time I tried these little bites of goodness. It was a hectic afternoon, and I was searching for something healthy yet indulgent to keep my energy up. That’s when I stumbled upon this recipe. It’s incredibly simple, requiring no baking, which is an absolute blessing in the heat of summer. The blend of flavors and textures from the almonds, oats, and a touch of maple syrup creates a delightful snack that you can enjoy anytime. Whether you’re heading out for a hike or simply need a pick-me-up between meals, these energy balls are perfect. Plus, they’re incredibly customizable! You can easily swap in your favorite nuts or seeds, making them versatile for every taste.
Recipe Snapshot
35 mins
35 mins
0 mins
Easy
155 kcal
4 g
Gluten-Free
7 g
Cutting Board, Mixing Bowl
Why You Need This No Bake Almond Energy Balls
They’re Quick to Prepare
One of the best things about No Bake Almond Energy Balls is how quickly you can whip them up. You’ll need just a handful of ingredients and a mixing bowl. Within minutes, you can have a batch ready to chill in the fridge. For busy folks like us, that’s a real lifesaver.
Healthy and Nutritious
These bites aren’t just delicious; they’re packed with nutrients. The oats provide fiber to keep you full, while almonds offer healthy fats and protein. If you use natural almond butter, you’re also getting a dose of vitamins and minerals. It’s a guilt-free treat that keeps your energy levels steady.
Perfect for Meal Prep
What I love most is that these energy balls are ideal for meal prep. You can make a big batch on the weekend and store them in the fridge for quick grab-and-go snacks throughout the week. They’re great for busy mornings or as an afternoon pick-me-up.
Kid-Friendly and Fun
If you have kids, they’ll love helping you make these! It’s a simple recipe that’s perfect for little hands. Plus, you can get creative with mix-ins like mini chocolate chips or dried fruit, making it a fun activity for the whole family.
Customizable
Don’t feel limited to the ingredients I’ve shared. You can switch things up based on what you have at home. Prefer sunflower butter? Go for it! Want to add in some chia seeds or flaxseed? Why not! These energy balls can easily adapt to your pantry staples.
No Bake Almond Energy Balls Ingredients

The ingredients for No Bake Almond Energy Balls are carefully chosen to create a nutritious and satisfying snack. Each element plays a vital role in flavor and texture, resulting in a delightful experience with every bite. You’ll find that the combination of oats, almonds, and natural sweeteners not only provides energy but also keeps you feeling full. Let’s take a closer look at these key players:
- 1 cup old-fashioned oats: These form the base of our energy balls, providing texture and fiber to keep you full.
- 1/4 cup almond butter: A creamy and nutritious addition that binds everything together while adding healthy fats.
- 1/4 cup maple syrup: This natural sweetener adds just the right amount of sweetness to balance the flavors.
- 1/4 cup almonds: Finely diced for a nice crunch and additional protein.
- 1/2 teaspoon pure vanilla extract: Adds a lovely depth of flavor.
- 1/4 cup mini chocolate chips: Optional, but they definitely make these energy balls taste like a treat!
Step by Step Guide for No Bake Almond Energy Balls

Making No Bake Almond Energy Balls is an enjoyable process that requires minimal effort. It’s perfect for those who prefer quick recipes without compromising on taste. You’ll start by mixing all the ingredients and then let them set in the fridge. Follow these steps for a successful outcome:
- Begin by gathering all your ingredients and a large mixing bowl. Take your old-fashioned oats and add them to the bowl. This will be the foundation of your energy balls, providing that hearty texture we love.
- Next, pour in the almond butter. It’s crucial to use a natural variety since it will help bind the mixture together. As you add it, notice how it creates a creamy layer that will enhance the flavor.
- Now, drizzle in the maple syrup. This will not only sweeten your energy balls but will also contribute to the moisture needed for binding. Mix everything together thoroughly.
- Chop your almonds finely if you haven’t done so already, then add them to the bowl. They add a delightful crunch that contrasts beautifully with the creaminess of the almond butter.
- For an extra flavor boost, incorporate the pure vanilla extract. This will enhance the overall taste and add depth.
- If you’re using mini chocolate chips, fold them into the mixture at this stage. They will provide a lovely surprise in each bite.
- Once everything is well combined, it’s time to shape your energy balls. Use your hands to roll the mixture into 1.5-inch balls. This step is where the fun begins! You can make them as big or as small as you like.
- After you’ve rolled all the balls, line a baking sheet with parchment paper. Place the energy balls on the sheet, giving them space to breathe.
- Now, pop the baking sheet in the refrigerator and let the balls chill for about 30 minutes. This will firm them up and make them easier to handle.
- Once chilled, you can enjoy your No Bake Almond Energy Balls immediately or store them in an airtight container. They’ll stay fresh for several days!
Things Worth Knowing
- Texture Tip: Ensure that the mixture is not too dry. If it seems crumbly, adding a little more almond butter or maple syrup can help bind it.
- Chilling Time: Don’t skip the chilling step! This helps the flavors meld and makes the balls firmer.
- Mixing Method: A sturdy spatula or your hands works best for mixing. Get in there to ensure that all ingredients are well combined.
- Ingredient Variations: Feel free to experiment with different nuts or seeds for varied flavors and textures.
Tips and Tricks about No Bake Almond Energy Balls

Every great recipe comes with its own set of tips to enhance your cooking experience. Here are some helpful hints to keep in mind when making No Bake Almond Energy Balls:
- Storage: Keep your energy balls in an airtight container in the refrigerator. They will last up to one week, making them a convenient snack option.
- Freezing: You can freeze these energy balls for up to three months. Simply thaw them in the refrigerator before enjoying.
- Pairing: These energy balls are perfect for pairing with a smoothie or yogurt for a filling breakfast.
- Adjusting Sweetness: If you prefer a less sweet treat, reduce the amount of maple syrup or use unsweetened nut butter.
- Adding Flavor: Consider incorporating spices like cinnamon or nutmeg for a warm flavor twist.
What to Pair With No Bake Almond Energy Balls
Finding the right pairings for your No Bake Almond Energy Balls can elevate your snack time experience. Here are some delightful ideas:
- Fruit Slices: Serve with fresh slices of apple or banana for a refreshing contrast.
- Yogurt: Dip them in Greek yogurt for an added protein boost and creaminess.
- Trail Mix: Pair with your favorite trail mix for a crunchy and satisfying snack.
- Smoothies: Enjoy with a smoothie for a well-rounded breakfast or post-workout treat.
- Nut Butter Spread: Spread a little extra almond butter on a rice cake or toast and enjoy with these energy balls.
- Meal Prep: Great for meal prep, these energy balls make an excellent addition to lunchboxes or on-the-go snacking.
FAQ
Conclusion
In conclusion, No Bake Almond Energy Balls are a delightful way to satisfy your sweet tooth while fueling your body with wholesome ingredients. They’re easy to make, perfect for on-the-go snacking, and adaptable to your preferences. I encourage you to give this recipe a try; you’ll love how quickly they come together and how delicious they are. They might just become your new favorite snack!

No Bake Almond Energy Balls
Equipment
- Cutting Board
- Mixing Bowl
Ingredients
- 1 cup old-fashioned oats
- 1/4 cup almond butter
- 1/4 cup maple syrup
- 1/4 cup almonds
- 1/2 teaspoon pure vanilla extract
- 1/4 cup mini chocolate chips
Instructions
- Combine all ingredients in a large mixing bowl and mix until well combined.
- Place the mixture into the refrigerator for about 30 minutes or until the mixture as slightly set and easy to handle.
- Roll into 1.5 inch balls and place on a parchment-lined baking sheet.
- Serve immediately, or store refrigerated in an airtight container.
Notes
- Storage: Keep your energy balls in an airtight container in the refrigerator. They will last up to one week, making them a convenient snack option.
- Freezing: You can freeze these energy balls for up to three months. Simply thaw them in the refrigerator before enjoying.
- Pairing: These energy balls are perfect for pairing with a smoothie or yogurt for a filling breakfast.
- Adjusting Sweetness: If you prefer a less sweet treat, reduce the amount of maple syrup or use unsweetened nut butter.
- Adding Flavor: Consider incorporating spices like cinnamon or nutmeg for a warm flavor twist.