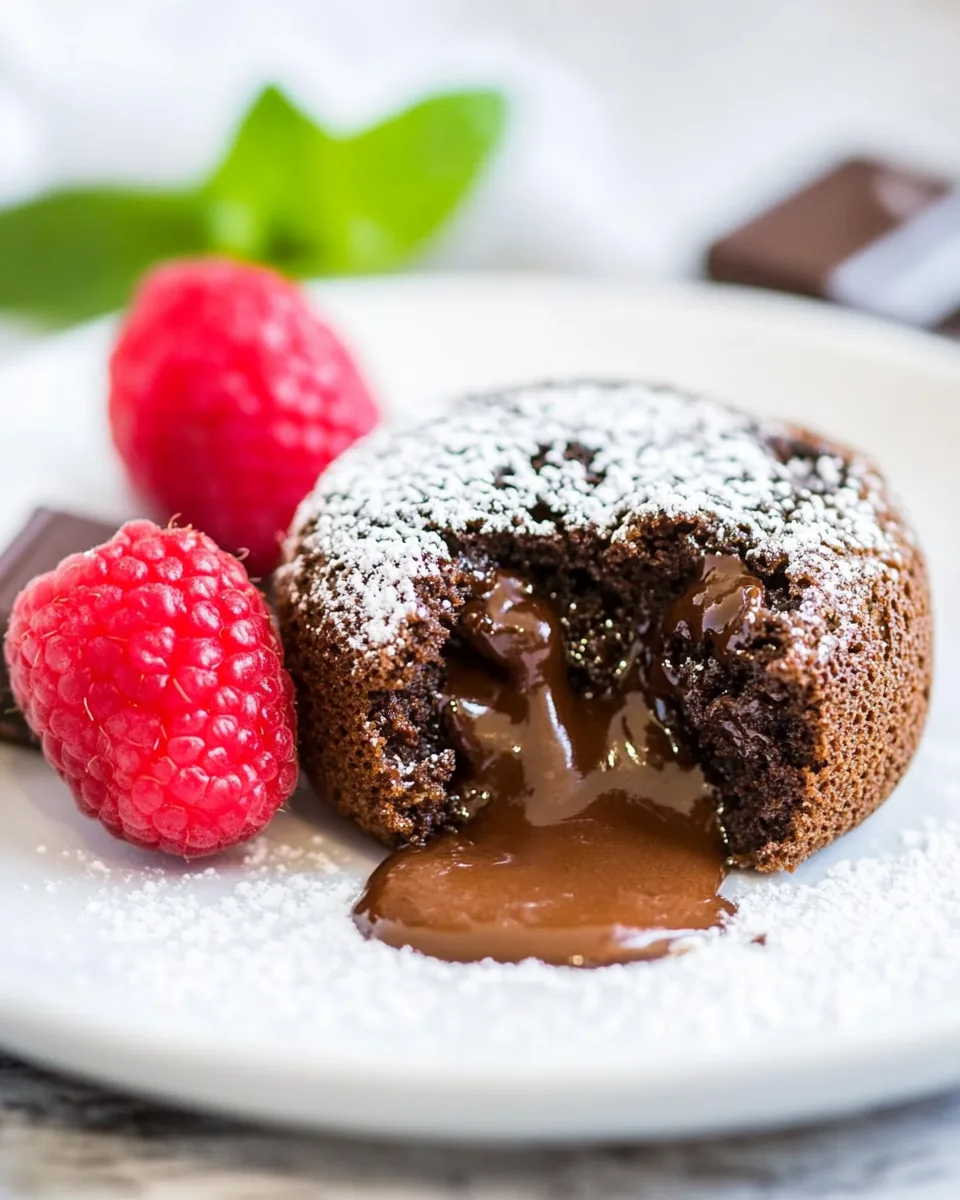
Molten Chocolate Lava Cakes
There’s something magical about indulging in a warm, gooey dessert that flows like a river of chocolate. That’s exactly what you get with Molten Chocolate Lava Cakes. I remember the first time I tried baking them; it was a chilly evening, and I had friends over for dinner. As I pulled the cakes from the oven, their rich aroma filled the room, and the anticipation was palpable. The moment we dug in, the centers erupted with molten chocolate, and everyone was left in awe. It was pure bliss, and since then, I’ve made it a tradition to whip up these decadent treats for special occasions or simply when I need a little pick-me-up.
Recipe Snapshot
30 mins
18 mins
12 mins
Medium
350 kcal
5 g
Gluten-Free, Low FODMAP
18 g
Wooden Spoon, Mixing Bowl, Frying Pan, Chef’s Knife, Saucepan, Whisk, Baking Sheet, Oven
What Makes This Molten Chocolate Lava Cakes Special
Decadent Chocolate Flavor
One of the standout features of Molten Chocolate Lava Cakes is their rich, chocolatey flavor. I use quality semisweet chocolate, which gives the cake a luscious depth that’s hard to resist. Each bite provides a perfect balance between sweetness and the slight bitterness of chocolate, leaving you craving more.
Impressive Presentation
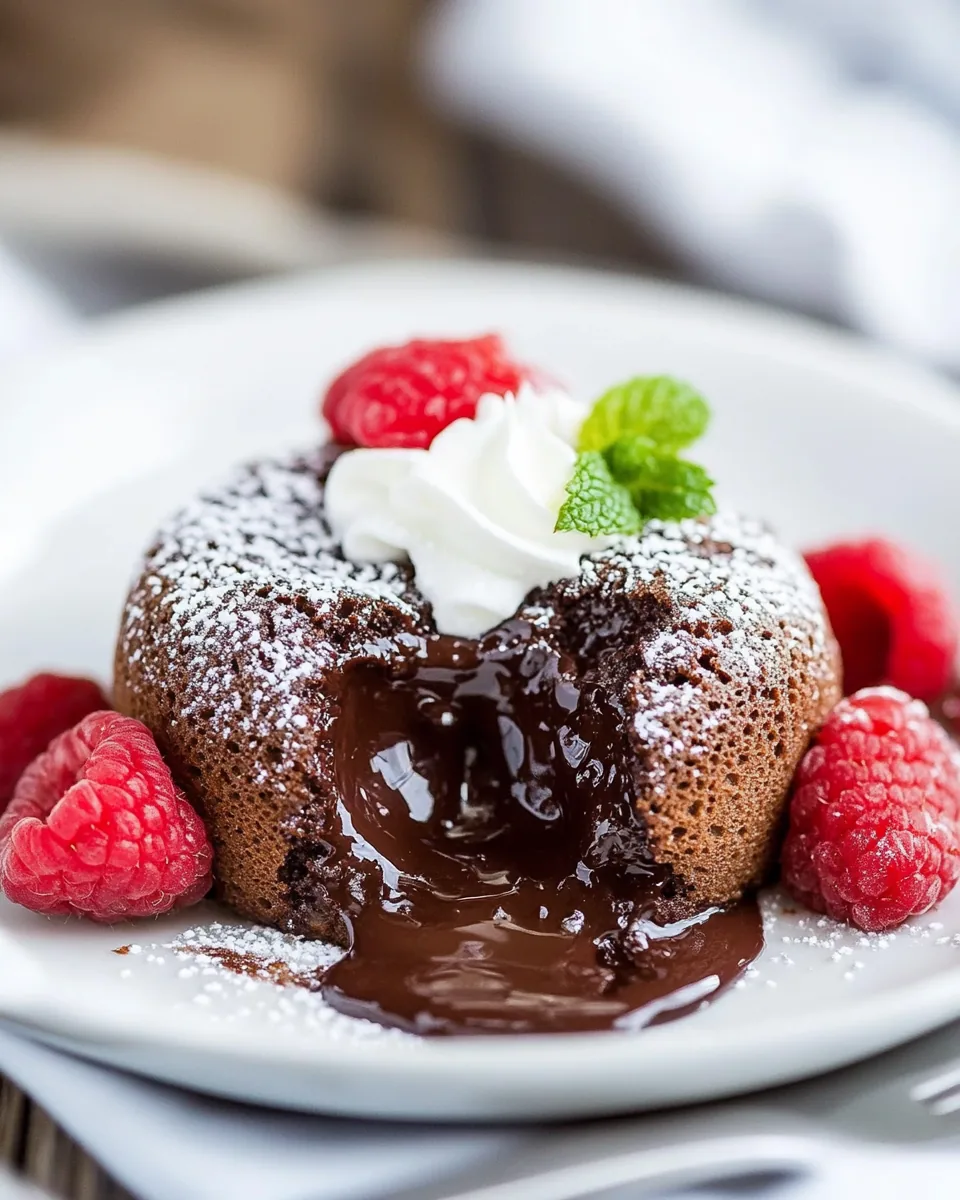
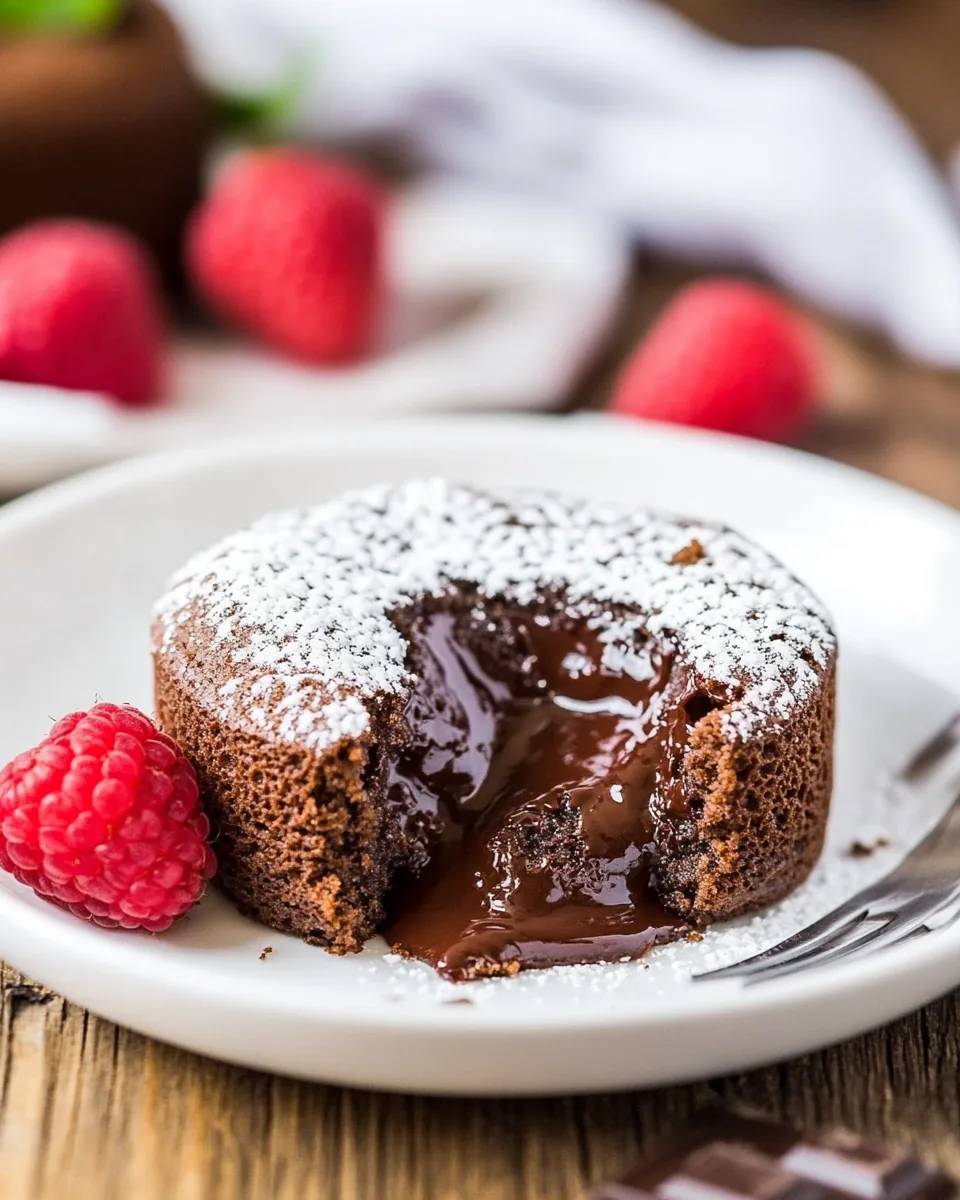
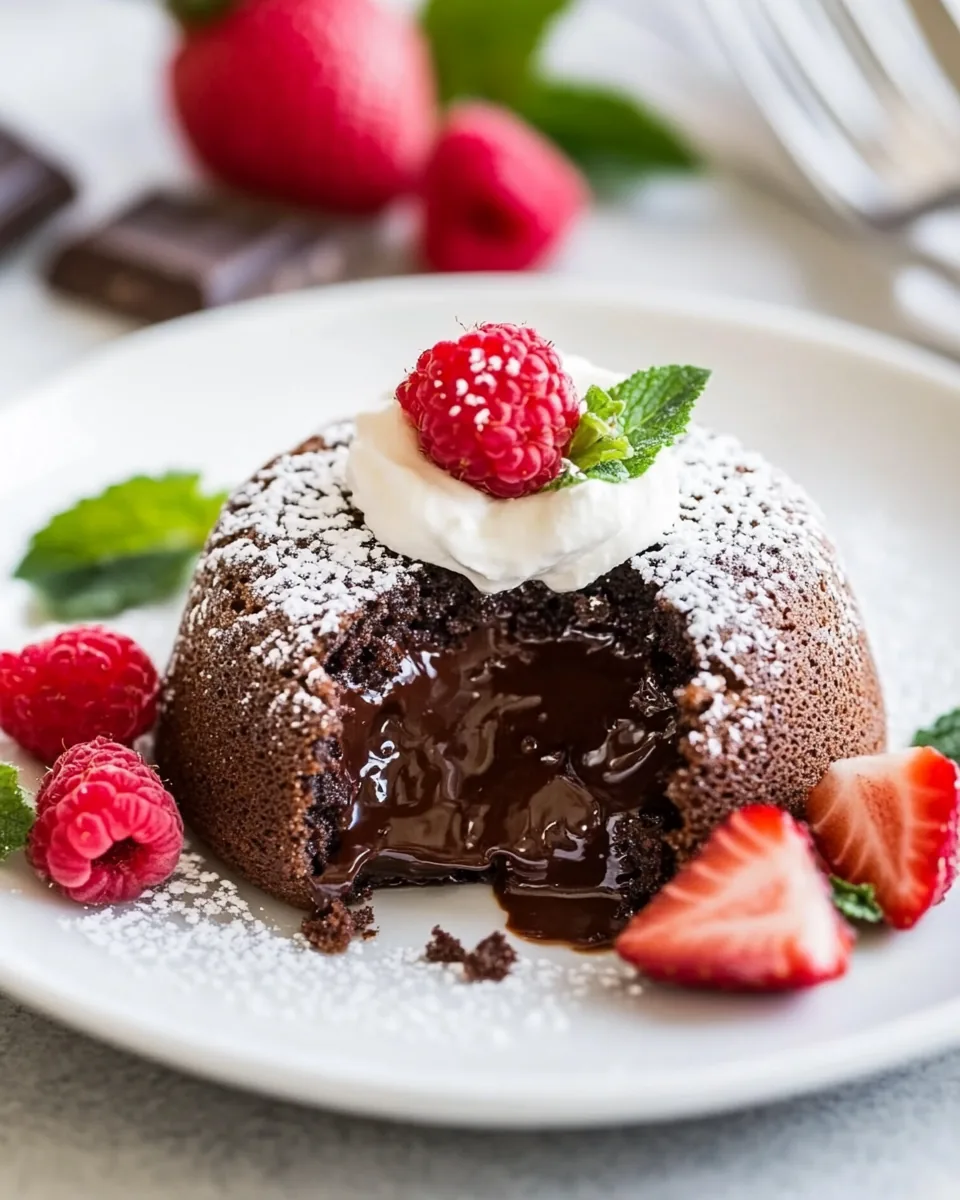
When you serve these cakes, they look stunning. The contrast of the dark brown cake with the flowing chocolate center creates an elegant dish that’s perfect for dinner parties. Everyone will be impressed when you present them with a plate of Molten Chocolate Lava Cakes, and they’ll never guess how easy they are to make!
Perfectly Satisfying Texture
The texture is another reason to love these cakes. The outside is slightly crispy, while the inside is ooey-gooey. When you break into them, the molten center spills out, creating a delightful contrast that makes for a truly satisfying dessert experience.
Quick to Prepare
Another reason I adore Molten Chocolate Lava Cakes is how quick they are to prepare. With just a handful of ingredients and minimal effort, you can have them ready to bake in no time. This makes them an excellent choice for when you have unexpected guests or need a last-minute dessert.
Customizable and Versatile
These cakes are also versatile. You can experiment with different types of chocolate or add a hint of orange zest or espresso powder for a unique twist. You could even top them with a scoop of vanilla ice cream or freshly whipped cream to elevate the experience even further.
Memorable Moments
Finally, nothing beats the joy of sharing Molten Chocolate Lava Cakes with friends and family. The reactions when they take that first bite and taste the warm chocolate center are priceless. It’s a dessert that’s not just about taste; it’s about creating memories together.
What to Buy for Molten Chocolate Lava Cakes
When it comes to making Molten Chocolate Lava Cakes, the quality of ingredients is crucial to achieving that rich and decadent flavor. Each ingredient plays a vital role in the overall experience of the cake. Using fresh, high-quality items ensures that every bite is as delightful as possible.
- Unsalted butter – Essential for achieving a rich texture and flavor, it helps in creating that lovely, moist cake.
- Semi-sweet chocolate chips – These are the heart of the dish, providing that gooey chocolate center that makes these cakes so special.
- Large eggs – They help bind the ingredients together and contribute to the cake’s structure.
- Sugar – A must for sweetness, balancing the deep chocolate flavor perfectly.
- Salt – Just a pinch enhances the sweetness and the overall flavor profile.
- Vanilla extract – Adds a warm undertone that complements the chocolate beautifully.
- All-purpose flour – This gives the cake its structure while allowing it to remain soft and molten inside.
Recipe Directions for Molten Chocolate Lava Cakes
Making Molten Chocolate Lava Cakes is an easy and enjoyable process. Follow these steps closely to ensure each cake comes out perfectly. Soon, you’ll have warm, chocolatey desserts ready to impress!
- Start by prepping your ramekins. Grease four 8-ounce ramekins with butter and then dust the insides with a bit of flour, tapping out any excess. This will help the cakes release smoothly after baking.
- Next, set a mixing bowl over a medium saucepan filled with about one cup of water (make sure the bowl doesn’t touch the water). Add the semisweet chocolate and the sliced butter to the bowl. Turn the heat to low and stir continuously using a spatula until the mixture is melted and smooth. Once fully melted, carefully remove it from the heat and set aside while you work on the egg mixture.
- In a separate bowl, combine the eggs, egg yolks, sugar, and salt. Using an electric mixer, beat the mixture on high speed for about five minutes. You want it to become thick, pale, and fluffy. This step is crucial for creating a light texture in the final product.
- Now, gently pour the warm chocolate mixture into the egg mixture. Add the vanilla extract and fold the two mixtures together until they are mostly combined. Be careful not to overmix; you want to keep as much air in the batter as possible.
- Next, sift in the flour and fold it gently until fully incorporated. The batter should be smooth and glossy.
- Divide the batter evenly between the prepared ramekins. Be sure not to overfill them; about three-quarters full is perfect.
- Preheat your oven to 450 degrees Fahrenheit (about 230 degrees Celsius). Once heated, carefully place the ramekins in the oven and bake for 10 to 12 minutes. You’ll know they are done when the outside appears firm to the touch, but the centers still have a slight jiggle.
- After baking, remove the ramekins from the oven and let them cool for about one minute. To release the cakes, run a small knife around the edges. Then, invert each ramekin onto a plate to reveal the beautiful, molten center.
- Dust with powdered sugar on top and serve immediately. Watching the chocolate lava flow as you cut into them is the best part!
Things Worth Knowing
- Alternate Ramekin Sizes: If you prefer smaller portions, using 4-ounce ramekins or a non-stick muffin tin can yield six smaller cakes. Just adjust the baking time to about 6 to 8 minutes.
- Testing for Doneness: The cakes should have firm edges but soft and jiggly centers. If they puff up too much, you’ve overbaked them, and they won’t be molten.
- Making Ahead: You can prepare the batter ahead of time and refrigerate it. Just remember to bring it to room temperature before baking.
- Serving Suggestions: For an extra treat, serve with a scoop of vanilla ice cream, whipped cream, or fresh berries to cut through the richness of the cake.
Make It Your Own
There are several ways to customize your Molten Chocolate Lava Cakes to suit your tastes. Experimenting can lead to delightful new flavors!
- Flavor Twists: Try adding a hint of espresso powder or orange zest to the batter for a unique flavor profile.
- Chocolate Variations: Experiment with dark chocolate or white chocolate for different taste experiences.
- Serving Style: For a more elegant dessert, plate with a drizzle of raspberry sauce or caramel.
- Storage: Leftover cakes can be stored in an airtight container in the refrigerator for up to three days. Reheat gently in the microwave before serving.
- Freezing: You can freeze unbaked batter in the ramekins. Just bake directly from the freezer, adding a couple of extra minutes to the baking time.
- Pairing: Enjoy these with a rich coffee or a scoop of ice cream for a delightful dessert experience.
Serve This Molten Chocolate Lava Cakes With
When it comes to serving Molten Chocolate Lava Cakes, there are many delightful options to enhance the experience. Consider the following ideas:
- Fresh Berries: Pairing with strawberries, raspberries, or blueberries adds a refreshing contrast to the rich chocolate.
- Ice Cream: A scoop of vanilla ice cream on the side will melt slightly into the warm cake, creating a delicious blend.
- Whipped Cream: Light and airy whipped cream complements the dense cake wonderfully.
- Chocolate Sauce: Drizzling some extra chocolate sauce on top can take the dessert to the next level.
- Coffee or Espresso: A cup of strong coffee or espresso pairs beautifully, enhancing the chocolate flavor and making for a perfect after-dinner treat.
- Seasonal Fruits: Seasonal fruits can elevate the presentation and flavor profile, making it suitable for any occasion.
FAQ
Conclusion
In conclusion, Molten Chocolate Lava Cakes are a crowd-pleaser that combines rich flavors with an unforgettable presentation. The moment you cut into them and watch the chocolate flow, you’ll understand why they’re a favorite for so many. I encourage you to try making them for your next gathering or even just for a cozy night in. Nothing beats the warmth of homemade chocolate desserts, and these cakes are sure to bring smiles to everyone around the table.

Molten Chocolate Lava Cakes
Equipment
- Wooden Spoon
- Mixing Bowl
- Frying Pan
- Chef's Knife
- Saucepan
- Whisk
- Baking Sheet
- Oven
Ingredients
- 8 Tbsp Unsalted Butter cut into slices, plus more to grease ramekins
- 6 oz Semi-Sweet Chocolate Chips
- 2 large Eggs (whole eggs)
- 2 large Egg Yolks
- 1/4 cup Sugar
- 1/4 tsp Salt
- 1 tsp Vanilla Extract
- 3 Tbsp All-Purpose Flour plus more to dust ramekins
Instructions
- Start by prepping your ramekins. Grease four 8-ounce ramekins with butter and then dust the insides with a bit of flour, tapping out any excess. This will help the cakes release smoothly after baking.
- Next, set a mixing bowl over a medium saucepan filled with about one cup of water (make sure the bowl doesn’t touch the water). Add the semisweet chocolate and the sliced butter to the bowl. Turn the heat to low and stir continuously using a spatula until the mixture is melted and smooth. Once fully melted, carefully remove it from the heat and set aside while you work on the egg mixture.
- In a separate bowl, combine the eggs, egg yolks, sugar, and salt. Using an electric mixer, beat the mixture on high speed for about five minutes. You want it to become thick, pale, and fluffy. This step is crucial for creating a light texture in the final product.
- Now, gently pour the warm chocolate mixture into the egg mixture. Add the vanilla extract and fold the two mixtures together until they are mostly combined. Be careful not to overmix; you want to keep as much air in the batter as possible.
- Next, sift in the flour and fold it gently until fully incorporated. The batter should be smooth and glossy.
- Divide the batter evenly between the prepared ramekins. Be sure not to overfill them; about three-quarters full is perfect.
- Preheat your oven to 450 degrees Fahrenheit (about 230 degrees Celsius). Once heated, carefully place the ramekins in the oven and bake for 10 to 12 minutes. You’ll know they are done when the outside appears firm to the touch, but the centers still have a slight jiggle.
- After baking, remove the ramekins from the oven and let them cool for about one minute. To release the cakes, run a small knife around the edges. Then, invert each ramekin onto a plate to reveal the beautiful, molten center.
- Dust with powdered sugar on top and serve immediately. Watching the chocolate lava flow as you cut into them is the best part!
Notes
- Alternate Ramekin Sizes: If you prefer smaller portions, using 4-ounce ramekins or a non-stick muffin tin can yield six smaller cakes. Just adjust the baking time to about 6 to 8 minutes.
- Testing for Doneness: The cakes should have firm edges but soft and jiggly centers. If they puff up too much, you’ve overbaked them, and they won’t be molten.
- Making Ahead: You can prepare the batter ahead of time and refrigerate it. Just remember to bring it to room temperature before baking.
- Serving Suggestions: For an extra treat, serve with a scoop of vanilla ice cream, whipped cream, or fresh berries to cut through the richness of the cake.