King Cake
King Cake has always felt like a small party wrapped in dough to me. The first time I sliced into one I remember the warm scent of cinnamon and butter rising up, the kind of aroma that pulls neighbors into the kitchen without invitation. Growing up, this cake marked the end of winter and the start of something social, when friends dropped by and everyone reached for a colorful slice. I still associate it with laughter, an intentionally hidden tiny charm, and the friendly arguing over who found it.
I’ve developed my approach to King Cake with an eye for texture and timing, and I love how simple ingredients combine into something festive. The dough should be soft and slightly tacky, the filling sweet and aromatic, and the glaze glossy enough to catch the light. Over the years I learned small tricks, like resting the dough in a slightly warm corner and using a gentle braid to keep the cake lofty. Those little choices change the final bite more than you might expect.
When I make King Cake now, I think about the ritual of sharing, the thrill of the hidden token, and the comfort of a slice served with conversation. This recipe is approachable enough for a weekend bake, yet it brings an unmistakable celebratory vibe to any table. Try making it with a friend and you will see how the process becomes as memorable as the cake itself.
Recipe Snapshot
60 mins
30 mins
30 mins
Medium
350 kcal
American
Gluten-Free, Low FODMAP
Desserts
Stand mixer, Dough hook, Whisk attachment, Mixing bowls, Rolling pin, Baking sheet, Parchment paper
Why We Love This King Cake
Celebratory Tradition and Story
I adore King Cake because it carries a tradition, a playful secret in every loaf, and it invites people to gather. I usually set aside a little ceremony for hiding the baby, and watching friends inspect their slices makes the moment. This cake is as much about the social ritual as it is about the food.
Texture and Balance
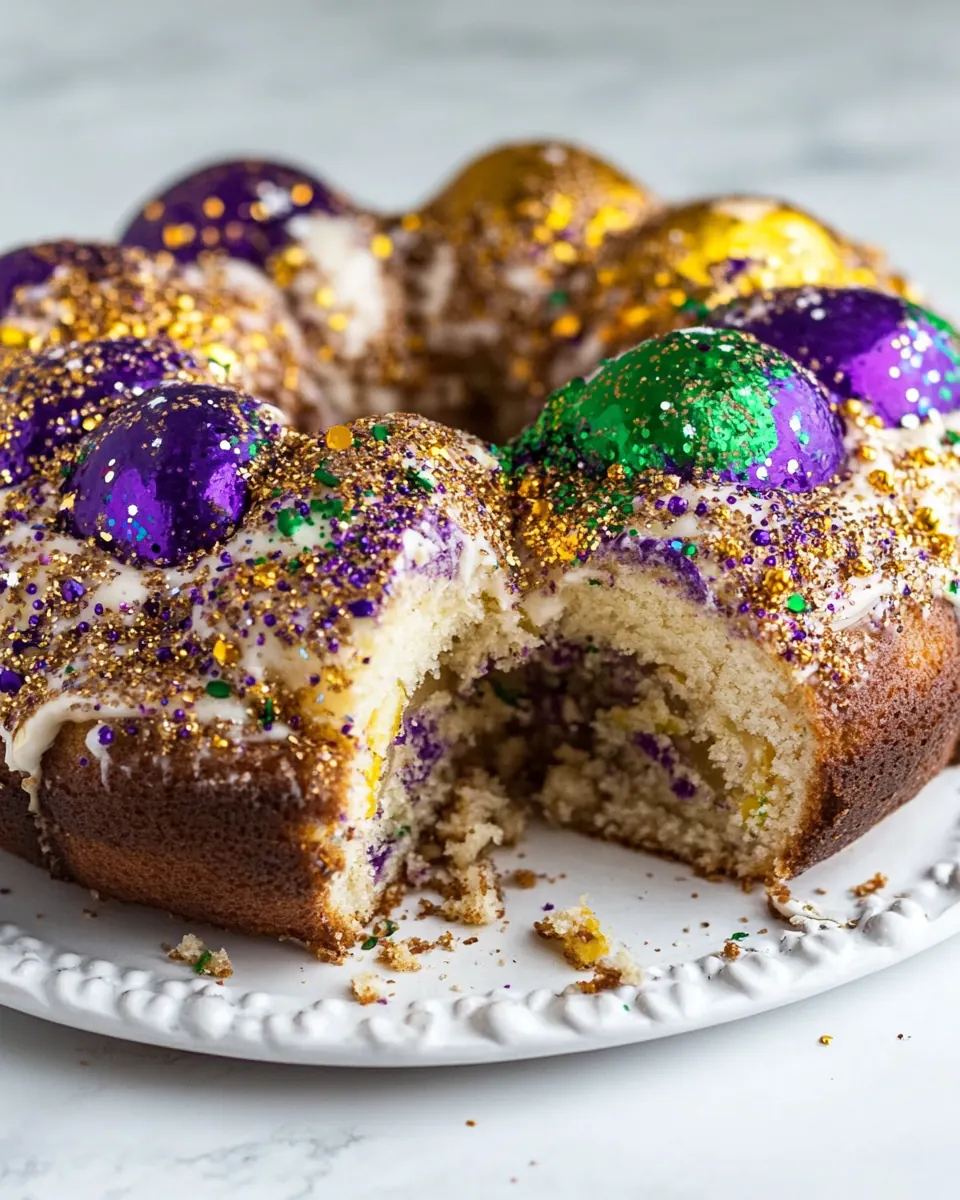
The soft, slightly sticky dough contrasts with a buttery, spiced filling and crunchy pecans. I love the way the all purpose flour and gentle kneading create an airy crumb, while the filling adds a rich, fragrant counterpoint. That contrast is what keeps each bite interesting.
Flavor That Feels Familiar
The combination of brown sugar, ground cinnamon, and unsalted butter tastes comfortingly classic. I always aim for a filling that is sweet but not cloying, where the spices shine through and the pecans add warmth. That familiar flavor profile is part of why people reach for second helpings.
Approachable Technique
Even though the cake looks impressive, the steps are straightforward, from proofing the dough to braiding the strips. I like that you can make this with basic tools, and that small adjustments, like adding a little flour if needed, help you achieve success without stress. The method rewards patience and gentle handling.
Visual Impact
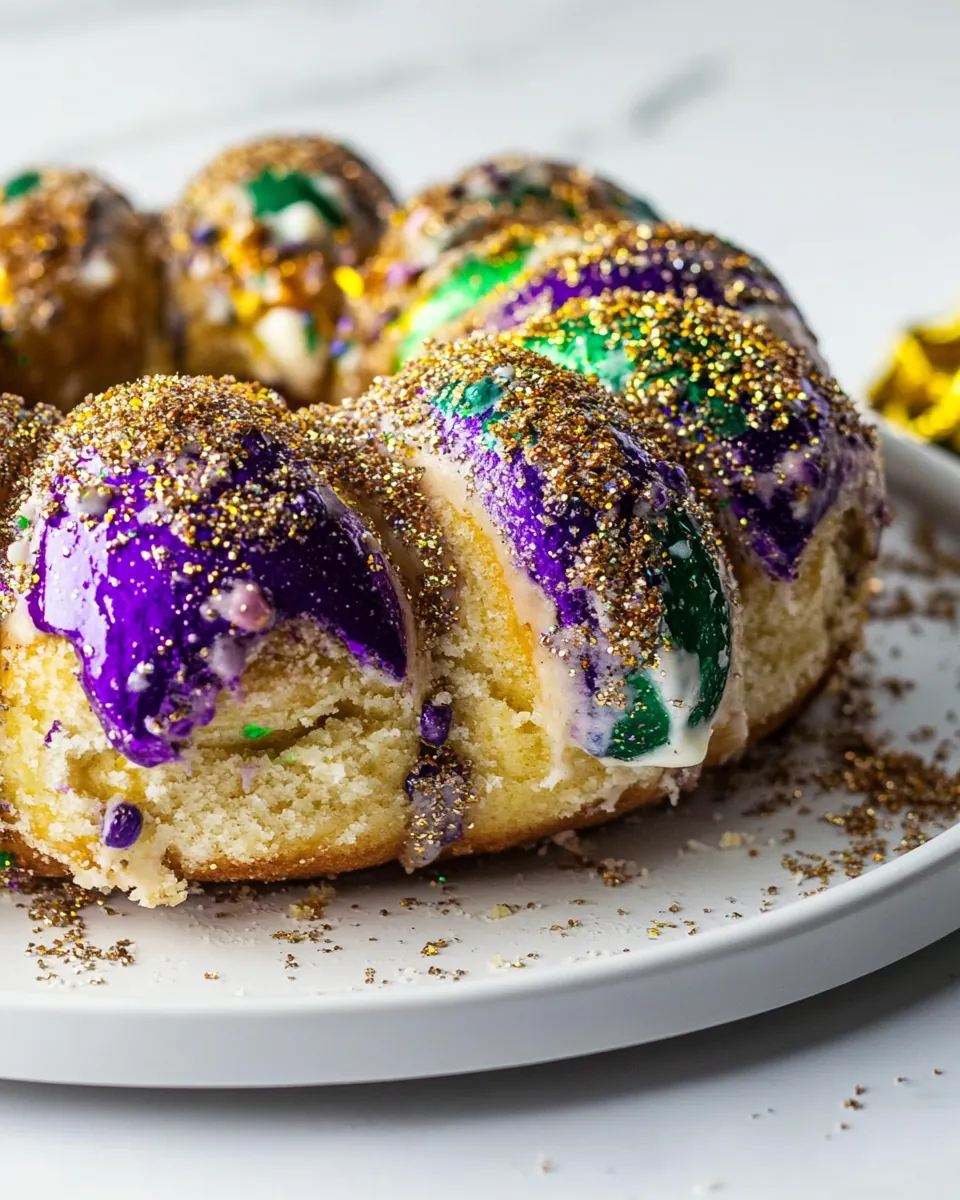
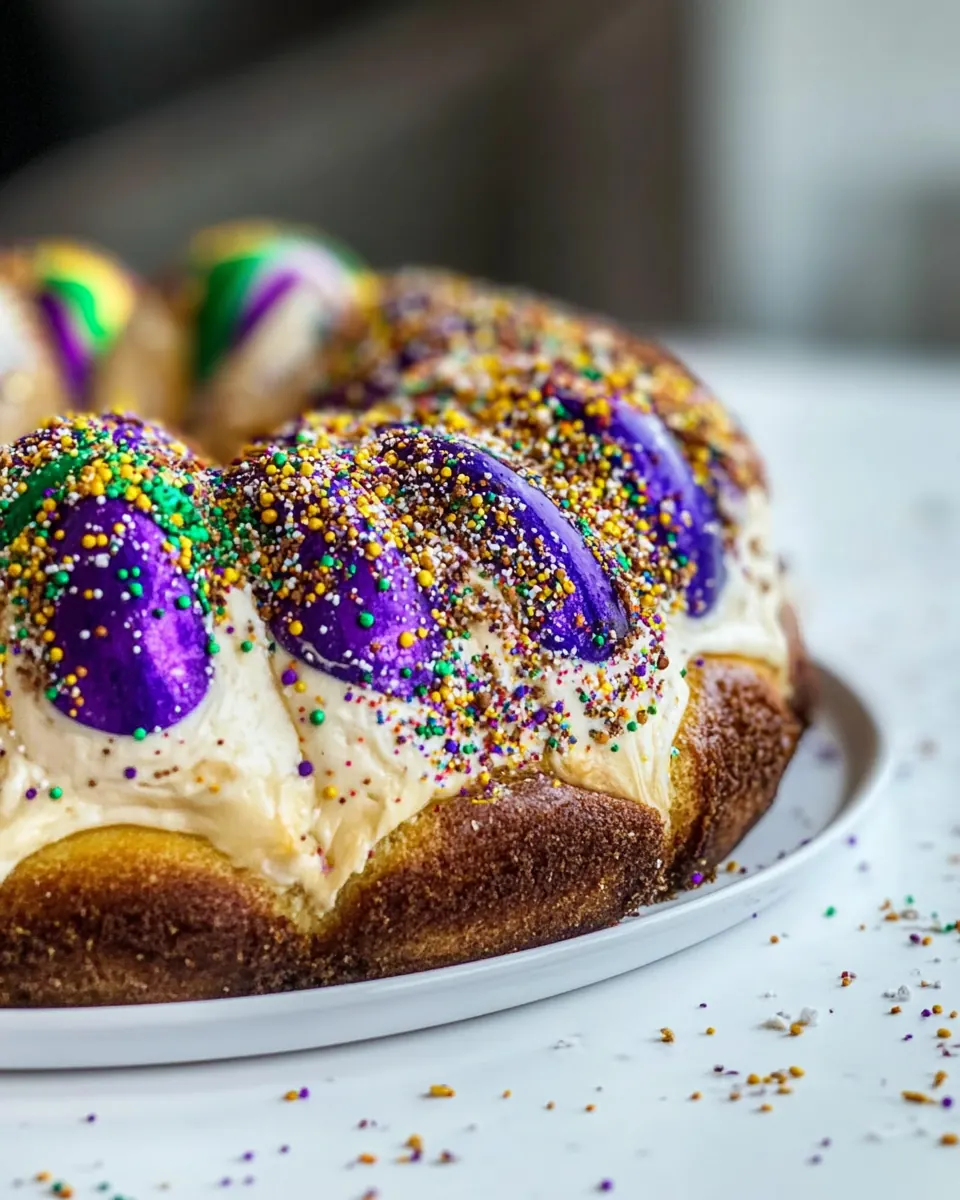
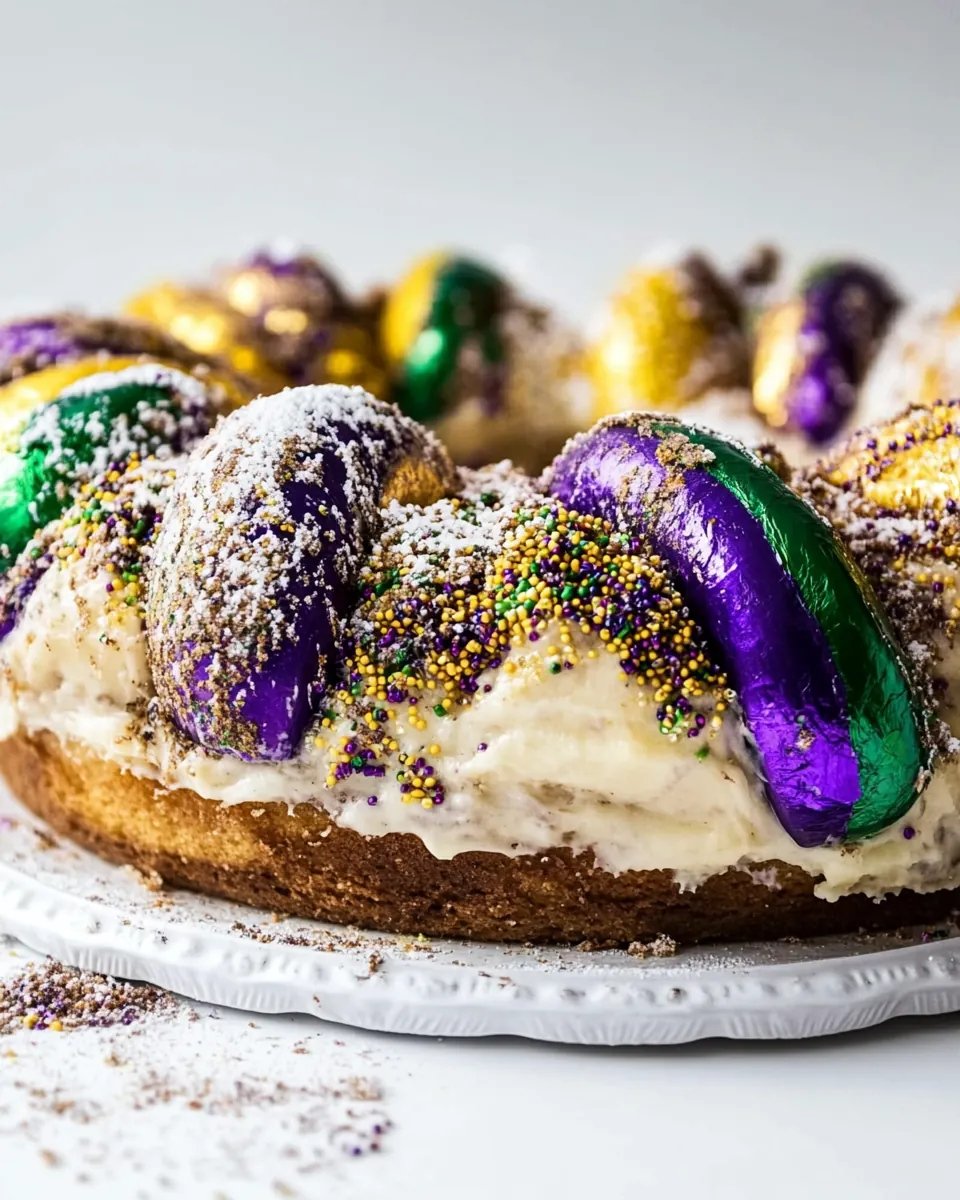
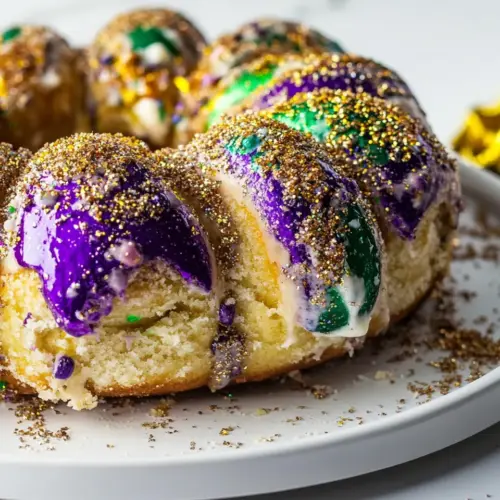
The final glaze and the colored sugars give King Cake an unmistakable look, turning a humble loaf into a centerpiece. I enjoy arranging the colored sugar in stripes, because presentation matters when you are sharing. It always makes people smile, and that response is what I bake for.
Essential Ingredients for King Cake
These ingredients form a classic, balanced King Cake. The dough relies on gentle yeast action and enriched components to create a tender crumb, while the filling combines sugars and spice for warmth. The glaze finishes the cake with a sweet sheen, and the colored sugar brings the festive look that makes this recipe unforgettable. Key players like all purpose flour, brown sugar, and ground cinnamon shape the texture and flavor.
- 1 cup warm milk: Warm and slightly sweet, provides the liquid base to activate yeast and hydrate the dough for proper gluten development and softness.
- 1 packet instant dry yeast, 2 1/2 teaspoons: Instantly leavening, helps the dough rise quickly by producing carbon dioxide when mixed with warm milk and sugar, ensuring a light, airy texture.
- 1/2 cup granulated sugar, divided: Sweet and partially used for activating yeast and flavoring, contributes sweetness to the dough while helping with browning and tender crumb.
- 1/3 cup unsalted butter, melted: Melted and rich, adds fat to tenderize the dough, improve mouthfeel, and carry flavor throughout the pastry for a softer crumb.
- 2 eggs, room temperature: Beaten and room temperature, contributes structure, moisture, and richness while aiding emulsification and improving crumb and color.
- 1 1/2 teaspoons salt: Salty and balancing, enhances overall flavor, strengthens gluten network a bit, and controls yeast activity for even fermentation.
- 4 5 cups all purpose flour: Starchy and structural, provides the bulk of the dough, develops gluten for chew and shape, and absorbs liquids to form the proper consistency.
- 1 cup brown sugar, packed: Sweet and moist, forms the base of the cinnamon filling, adds caramel-like notes and chewiness that complement the spiced center.
- 1 tablespoon ground cinnamon: Warm and aromatic, infuses the filling with its sweet-spicy flavor, pairing with brown sugar to create the classic cinnamon swirl.
- 1/2 cup melted butter: Melted and rich, binds the filling ingredients together, adds richness and moisture to the swirl for a luscious interior.
- 3/4 cup chopped pecans: Crunchy and toasted, provides nutty flavor and texture contrast in the filling or topping, enhancing complexity and bite.
- 2 cups powdered sugar: Fine and sweet, creates a smooth glaze when combined with water and vanilla, adding sweetness and a glossy finish to the cake.
- 4 tablespoons water: Thin and hydrating, adjusts glaze consistency for proper drizzle or icing spread, helping powdered sugar dissolve smoothly.
- 1 teaspoon vanilla: Fragrant and sweet, enhances the glaze with vanilla aroma and depth, rounding out the sugary topping with a pleasant flavor.
- Colored sugar for the top, green purple and yellow: Brightly colored and crunchy, used as decorative topping to represent traditional King Cake colors, adding visual appeal and a bit of texture.
Recipe Steps for King Cake
These steps take you from a simple dough to a festive, braided cake. I walk through proofing, mixing, braiding, and finishing so you can follow a clear path. Move with intent, give the dough time, and enjoy the sensory signals that tell you you are on track.
- In the bowl of a stand mixer, combine your warm milk, yeast, and 3 tablespoons of your sugar. Allow the mixture to sit for about 5 minutes until the yeast becomes active and foamy.: The aroma of yeast awakening is subtle and slightly yeasty sweet, and you will see tiny bubbles form on the surface which signal activity, a reliable sign you are ready to proceed. I like to leave the bowl in a warm spot so the yeast can wake up happily; if your kitchen is cool, a slightly warmer surface helps. A common misstep is using milk that is too hot, which can kill the yeast, or too cold, which delays activation, so aim for a comfortable warm touch.
- Add in the rest of the sugar, butter, and eggs. Mix using the whisk attachment on medium high speed until everything comes together.: As the mixer runs you will notice the mixture lighten and become glossy, the eggs emulsifying with the melted butter and sugar for a cohesive base. The sound will be a steady, even hum, and the texture should shift from separate ingredients to a smooth batter. If you see curdling or separation, stop and scrape the bowl, then mix gently to re emulsify. Over mixing at this stage can incorporate too much air, which affects the dough consistency.
- Add 4 cups of flour and your salt into the bowl and switch out the whisk for the dough hook, mix at low speed until the flour is fully incorporated, at this point you can determine if you need to add more flour, the dough should pull clean from the mixer when it is the right consistency, but not be too stiff, it should be slightly sticky.: The first addition of all purpose flour starts to form structure, and you will hear the mixer change tone as the dough comes together. Watch for the dough to gather around the hook and begin to clean the bowl, yet remain slightly tacky; that tack indicates enough hydration for a tender loaf. Adding too much flour will yield a heavy result, while too little will make handling messy, so adjust gradually.
- Increase the speed to a medium high speed and mix for an additional 3-4 minutes. This last step will knead the dough and build the strength of the gluten.: During this kneading phase the dough will become smoother and more elastic, and you may feel it stretch when you pull a piece. That elasticity means the gluten has developed enough to trap gases for a good rise, leading to an airy crumb. If the dough resists and tears, you likely need a touch more rest or a small addition of water; the mistake to avoid here is under kneading which results in dense texture.
- Remove the dough from your mixer and place it into an oiled bowl, cover with plastic wrap and keep covered for about an hour, until the dough doubles in size.: The dough will slowly puff and become noticeably lighter, a soft rounded dome forming in the bowl, and it will spring back slightly when touched gently. I like to mark the bowl with a piece of tape to track rise visually. Cold drafts can slow proofing, and rushing this step with heat will create uneven fermentation, so be patient and let the dough nearly double for best structure.
- While your dough is proofing, make your filling. In a medium bowl, mix your sugar, cinnamon, and butter. Set aside.: The filling should smell warmly spiced and look smooth and spreadable, the brown sugar melding with the ground cinnamon and melted butter . Stir until homogenous so each bite has even flavor distribution. If the filling seems dry add a touch more melted butter; a common error is leaving lumps of sugar that create uneven pockets when baked.
- Once your dough is doubled in size, tip it out onto a floured surface, roll into a large rectangle, mine was about 24 inches by 15 inches. Cut the slab into 3 equal strips, mine were 24 inches by 5 inches.: Rolling creates the canvas for the filling, and you will feel the dough stretch under the pin, becoming smooth and even. The rectangle dimensions help you make uniform strips so the braid bakes evenly; inconsistent sizing leads to uneven baking. Keep the surface lightly floured to prevent sticking, but not so much that the dough dries out.
- Spread your filling evenly on each strip and sprinkle your chopped pecans on top. Roll each strip lengthwise so you have 3 long filled rolls. Once your filled strips are ready you will braid them together.: As you spread, the filling should glisten and cling, the aroma of ground cinnamon becoming more pronounced, and the pecans adding a toasty texture. Rolling tightly ensures layers and prevents filling from leaking; if you roll too loosely the braid will lose definition while baking. Wipe away excess filling from edges to make sealing easier.
- Lay the strips side by side and secure them together at the top. Braid the whole length of the 3 strips together and secure the other end by pinching the dough together. Form the braid into a circle and secure the two ends together as best as you can.: Braiding compresses the rolls and creates those beautiful swirls when sliced, and you should hear a soft, plump feel as the strands compress. Pinch seams firmly to prevent separation during the second rise and baking. A frequent problem is braiding too loosely which leads to gaps and filling leakage, so keep a confident, steady hand.
- Place the prepared rolled and braided dough onto a baking sheet lined with parchment. Cover and allow the cake to proof until it is nearly double in size, depending on the temperature of the room you are making this cake in it could take 45 minutes to a little over an hour.: During this final proof the braid will round and fill out, and you will see the braided lanes puff softly. Proofing until nearly doubled ensures the crumb will be tender but stable enough to hold shape in the oven. Over proofing can cause collapse, so watch for a gentle spring back when pressed lightly.
- While your cake proofs, preheat your oven to 375 degrees fahrenheit.: Preheating ensures an immediate, steady oven environment which helps set the crust and encourages even browning, producing that attractive golden surface. I preheat early so the oven is stable when the cake goes in. A common misstep is putting the cake in before the oven reaches temperature, which can affect rise and color.
- Once the cake is ready, bake for 25-30 minutes, a toothpick inserted should come out clean, and the loaf should be a golden brown color all over. Remove from the oven and allow the cake to cool completely before glazing.: As it bakes you will notice a rich golden hue and a deepening cinnamon aroma, and a clean toothpick indicates the interior is set. Cooling fully prevents the glaze from melting away and keeps the colored sugar vibrant. Cutting too soon can make the glaze run and the texture gummy, so wait for a thorough cool.
- Before glazing your cake, take a mini plastic baby and poke it into one of the folds of your cake, hiding it completely for someone to find later.: The hidden token is the playful tradition, and slipping it into a fold ensures it stays undiscovered until servings are examined. I wrap the baby in a tiny piece of foil for safety and hygiene, then tuck it fully inside. Forgetting to hide the baby is an easy oversight, so do this step deliberately before glazing.
- In a medium bowl, mix together your powdered sugar, water, and vanilla. Pour the glaze over your cake evenly and while the glaze is still tacky, sprinkle the colored sugar over it in colored stripes.: The glaze should be silky and pourable, coating the loaf with a glossy sheen that sets slightly on the surface, and the vanilla brightens the sweetness. Work quickly so the colored sugar adheres while the glaze is tacky. If the glaze is too thin the sugars will slide off, so adjust consistency carefully.
- Make sure to have everyone inspect their cuts of cake to find the baby before eating!: The reveal is part of the fun, and I make a lighthearted announcement to check slices, which creates a moment of shared excitement. This tradition encourages conversation and laughter around the table. A practical precaution is to warn guests gently, so small children or someone who prefers to avoid surprises can be aware.
Tips and Variations
I like to approach small tweaks as ways to personalize King Cake without changing its heart. Below are practical tips and variations that help you bake confidently and make the cake your own.
- Mixing order matters: Start with yeast, warm milk, and a little sugar to ensure activation, because a strong proof sets up a predictable rise and airy crumb.
- Dough feel is your guide: Aim for a slightly tacky dough that pulls clean from the bowl, since this balance yields a soft crumb without becoming gummy.
- Measure flour by feel: Add extra flour gradually if needed, up to the listed amount, to avoid a dry heavy dough, and remember humidity affects how much flour you need.
- Braid tightly but gently: Keep the braid compact so it holds shape while baking, because loose braids can spread and lose the defined swirls.
- Use a thermometer for accuracy: If you are unsure, warm milk should be about 100 to 110 degrees fahrenheit to wake the yeast safely without harm.
- Ensure even baking: Rotate the baking sheet halfway through if your oven has hot spots, because that simple action prevents one side from over browning.
- Colored sugar application: Add colored sugars in stripes while the glaze is tacky so they adhere well and maintain vibrant stripes.
What Complements This King Cake
King Cake shines when paired with light, communal accompaniments that enhance its warm, spiced flavor. Below I outline serving ideas, occasions to share it, and storage guidance so your cake remains fresh and celebratory.
- Morning gatherings: Serve slices at brunch alongside hot coffee or tea, because the cake’s cinnamon and butter notes pair beautifully with bright, slightly bitter beverages.
- Party centerpiece: Use the cake as a centerpiece for holiday tables or seasonally themed gatherings, highlighting the colorful sugar stripes to set a festive tone.
- Family dessert: Offer slices after a shared meal for a casual dessert, since the cake’s richness makes it satisfying without heavy flourishes.
- Storage tips: Keep the cake at room temperature, covered, for up to two days to maintain the glaze texture, and refrigerate for longer storage, bringing it back to room temperature before serving.
- Occasions: This cake works well for winter celebrations, neighborhood parties, and any event where a playful tradition will be appreciated, because it invites interaction and conversation.
- Serving style: Slice into even portions and encourage guests to check for the token, making the find a lighthearted part of the meal that sparks laughter and stories.
- Seasonal pairing: During colder months serve with warm beverages and simple fruit plates to balance the sweet, spiced profile of the cake.
FAQ
Conclusion
What makes this recipe special is the blend of a tender, yeasted dough with a warm cinnamon and pecan filling, finished with a shiny glaze and festive colored sugars. I love how it turns a simple bake into a shared moment, complete with the playful tradition of a hidden token. I encourage you to try this version of King Cake with patience during proofs and a light touch while braiding, because the process is as rewarding as the result. Share it with friends, enjoy the aromas that fill your kitchen, and celebrate the small surprise that brings everyone together.
King Cake
Equipment
- Stand mixer
- Dough Hook
- Whisk attachment
- Mixing Bowls
- Rolling Pin
- Baking Sheet
- Parchment Paper
Ingredients
- 1 cup warm milk Warm and slightly sweet, provides the liquid base to activate yeast and hydrate the dough for proper gluten development and softness.
- 1 packet instant dry yeast, 2 1/2 teaspoons Instantly leavening, helps the dough rise quickly by producing carbon dioxide when mixed with warm milk and sugar, ensuring a light, airy texture.
- 1/2 cup granulated sugar, divided Sweet and partially used for activating yeast and flavoring, contributes sweetness to the dough while helping with browning and tender crumb.
- 1/3 cup unsalted butter, melted Melted and rich, adds fat to tenderize the dough, improve mouthfeel, and carry flavor throughout the pastry for a softer crumb.
- 2 eggs, room temperature Beaten and room temperature, contributes structure, moisture, and richness while aiding emulsification and improving crumb and color.
- 1 1/2 teaspoons salt Salty and balancing, enhances overall flavor, strengthens gluten network a bit, and controls yeast activity for even fermentation.
- 4 -5 cups all purpose flour Starchy and structural, provides the bulk of the dough, develops gluten for chew and shape, and absorbs liquids to form the proper consistency.
- 1 cup brown sugar, packed Sweet and moist, forms the base of the cinnamon filling, adds caramel-like notes and chewiness that complement the spiced center.
- 1 tablespoon ground cinnamon Warm and aromatic, infuses the filling with its sweet-spicy flavor, pairing with brown sugar to create the classic cinnamon swirl.
- 1/2 cup melted butter Melted and rich, binds the filling ingredients together, adds richness and moisture to the swirl for a luscious interior.
- 3/4 cup chopped pecans Crunchy and toasted, provides nutty flavor and texture contrast in the filling or topping, enhancing complexity and bite.
- 2 cups powdered sugar Fine and sweet, creates a smooth glaze when combined with water and vanilla, adding sweetness and a glossy finish to the cake.
- 4 tablespoons water Thin and hydrating, adjusts glaze consistency for proper drizzle or icing spread, helping powdered sugar dissolve smoothly.
- 1 teaspoon vanilla Fragrant and sweet, enhances the glaze with vanilla aroma and depth, rounding out the sugary topping with a pleasant flavor.
- Colored sugar for the top, green purple and yellow Brightly colored and crunchy, used as decorative topping to represent traditional King Cake colors, adding visual appeal and a bit of texture.
Instructions
- In the bowl of a stand mixer, combine your warm milk, yeast, and 3 tablespoons of your sugar. Allow the mixture to sit for about 5 minutes until the yeast becomes active and foamy.: The aroma of yeast awakening is subtle and slightly yeasty sweet, and you will see tiny bubbles form on the surface which signal activity, a reliable sign you are ready to proceed. I like to leave the bowl in a warm spot so the yeast can wake up happily; if your kitchen is cool, a slightly warmer surface helps. A common misstep is using milk that is too hot, which can kill the yeast, or too cold, which delays activation, so aim for a comfortable warm touch.
- Add in the rest of the sugar, butter, and eggs. Mix using the whisk attachment on medium high speed until everything comes together.: As the mixer runs you will notice the mixture lighten and become glossy, the eggs emulsifying with the melted butter and sugar for a cohesive base. The sound will be a steady, even hum, and the texture should shift from separate ingredients to a smooth batter. If you see curdling or separation, stop and scrape the bowl, then mix gently to re emulsify. Over mixing at this stage can incorporate too much air, which affects the dough consistency.
- Add 4 cups of flour and your salt into the bowl and switch out the whisk for the dough hook, mix at low speed until the flour is fully incorporated, at this point you can determine if you need to add more flour, the dough should pull clean from the mixer when it is the right consistency, but not be too stiff, it should be slightly sticky.: The first addition of all purpose flour starts to form structure, and you will hear the mixer change tone as the dough comes together. Watch for the dough to gather around the hook and begin to clean the bowl, yet remain slightly tacky; that tack indicates enough hydration for a tender loaf. Adding too much flour will yield a heavy result, while too little will make handling messy, so adjust gradually.
- Increase the speed to a medium high speed and mix for an additional 3-4 minutes. This last step will knead the dough and build the strength of the gluten.: During this kneading phase the dough will become smoother and more elastic, and you may feel it stretch when you pull a piece. That elasticity means the gluten has developed enough to trap gases for a good rise, leading to an airy crumb. If the dough resists and tears, you likely need a touch more rest or a small addition of water; the mistake to avoid here is under kneading which results in dense texture.
- Remove the dough from your mixer and place it into an oiled bowl, cover with plastic wrap and keep covered for about an hour, until the dough doubles in size.: The dough will slowly puff and become noticeably lighter, a soft rounded dome forming in the bowl, and it will spring back slightly when touched gently. I like to mark the bowl with a piece of tape to track rise visually. Cold drafts can slow proofing, and rushing this step with heat will create uneven fermentation, so be patient and let the dough nearly double for best structure.
- While your dough is proofing, make your filling. In a medium bowl, mix your sugar, cinnamon, and butter. Set aside.: The filling should smell warmly spiced and look smooth and spreadable, the brown sugar melding with the ground cinnamon and melted butter . Stir until homogenous so each bite has even flavor distribution. If the filling seems dry add a touch more melted butter; a common error is leaving lumps of sugar that create uneven pockets when baked.
- Once your dough is doubled in size, tip it out onto a floured surface, roll into a large rectangle, mine was about 24 inches by 15 inches. Cut the slab into 3 equal strips, mine were 24 inches by 5 inches.: Rolling creates the canvas for the filling, and you will feel the dough stretch under the pin, becoming smooth and even. The rectangle dimensions help you make uniform strips so the braid bakes evenly; inconsistent sizing leads to uneven baking. Keep the surface lightly floured to prevent sticking, but not so much that the dough dries out.
- Spread your filling evenly on each strip and sprinkle your chopped pecans on top. Roll each strip lengthwise so you have 3 long filled rolls. Once your filled strips are ready you will braid them together.: As you spread, the filling should glisten and cling, the aroma of ground cinnamon becoming more pronounced, and the pecans adding a toasty texture. Rolling tightly ensures layers and prevents filling from leaking; if you roll too loosely the braid will lose definition while baking. Wipe away excess filling from edges to make sealing easier.
- Lay the strips side by side and secure them together at the top. Braid the whole length of the 3 strips together and secure the other end by pinching the dough together. Form the braid into a circle and secure the two ends together as best as you can.: Braiding compresses the rolls and creates those beautiful swirls when sliced, and you should hear a soft, plump feel as the strands compress. Pinch seams firmly to prevent separation during the second rise and baking. A frequent problem is braiding too loosely which leads to gaps and filling leakage, so keep a confident, steady hand.
- Place the prepared rolled and braided dough onto a baking sheet lined with parchment. Cover and allow the cake to proof until it is nearly double in size, depending on the temperature of the room you are making this cake in it could take 45 minutes to a little over an hour.: During this final proof the braid will round and fill out, and you will see the braided lanes puff softly. Proofing until nearly doubled ensures the crumb will be tender but stable enough to hold shape in the oven. Over proofing can cause collapse, so watch for a gentle spring back when pressed lightly.
- While your cake proofs, preheat your oven to 375 degrees fahrenheit.: Preheating ensures an immediate, steady oven environment which helps set the crust and encourages even browning, producing that attractive golden surface. I preheat early so the oven is stable when the cake goes in. A common misstep is putting the cake in before the oven reaches temperature, which can affect rise and color.
- Once the cake is ready, bake for 25-30 minutes, a toothpick inserted should come out clean, and the loaf should be a golden brown color all over. Remove from the oven and allow the cake to cool completely before glazing.: As it bakes you will notice a rich golden hue and a deepening cinnamon aroma, and a clean toothpick indicates the interior is set. Cooling fully prevents the glaze from melting away and keeps the colored sugar vibrant. Cutting too soon can make the glaze run and the texture gummy, so wait for a thorough cool.
- Before glazing your cake, take a mini plastic baby and poke it into one of the folds of your cake, hiding it completely for someone to find later.: The hidden token is the playful tradition, and slipping it into a fold ensures it stays undiscovered until servings are examined. I wrap the baby in a tiny piece of foil for safety and hygiene, then tuck it fully inside. Forgetting to hide the baby is an easy oversight, so do this step deliberately before glazing.
- In a medium bowl, mix together your powdered sugar, water, and vanilla. Pour the glaze over your cake evenly and while the glaze is still tacky, sprinkle the colored sugar over it in colored stripes.: The glaze should be silky and pourable, coating the loaf with a glossy sheen that sets slightly on the surface, and the vanilla brightens the sweetness. Work quickly so the colored sugar adheres while the glaze is tacky. If the glaze is too thin the sugars will slide off, so adjust consistency carefully.
- Make sure to have everyone inspect their cuts of cake to find the baby before eating!: The reveal is part of the fun, and I make a lighthearted announcement to check slices, which creates a moment of shared excitement. This tradition encourages conversation and laughter around the table. A practical precaution is to warn guests gently, so small children or someone who prefers to avoid surprises can be aware.
Notes
- Mixing order matters: Start with yeast, warm milk, and a little sugar to ensure activation, because a strong proof sets up a predictable rise and airy crumb.
- Dough feel is your guide: Aim for a slightly tacky dough that pulls clean from the bowl, since this balance yields a soft crumb without becoming gummy.
- Measure flour by feel: Add extra flour gradually if needed, up to the listed amount, to avoid a dry heavy dough, and remember humidity affects how much flour you need.
- Braid tightly but gently: Keep the braid compact so it holds shape while baking, because loose braids can spread and lose the defined swirls.
- Use a thermometer for accuracy: If you are unsure, warm milk should be about 100 to 110 degrees fahrenheit to wake the yeast safely without harm.
- Ensure even baking: Rotate the baking sheet halfway through if your oven has hot spots, because that simple action prevents one side from over browning.
- Colored sugar application: Add colored sugars in stripes while the glaze is tacky so they adhere well and maintain vibrant stripes.