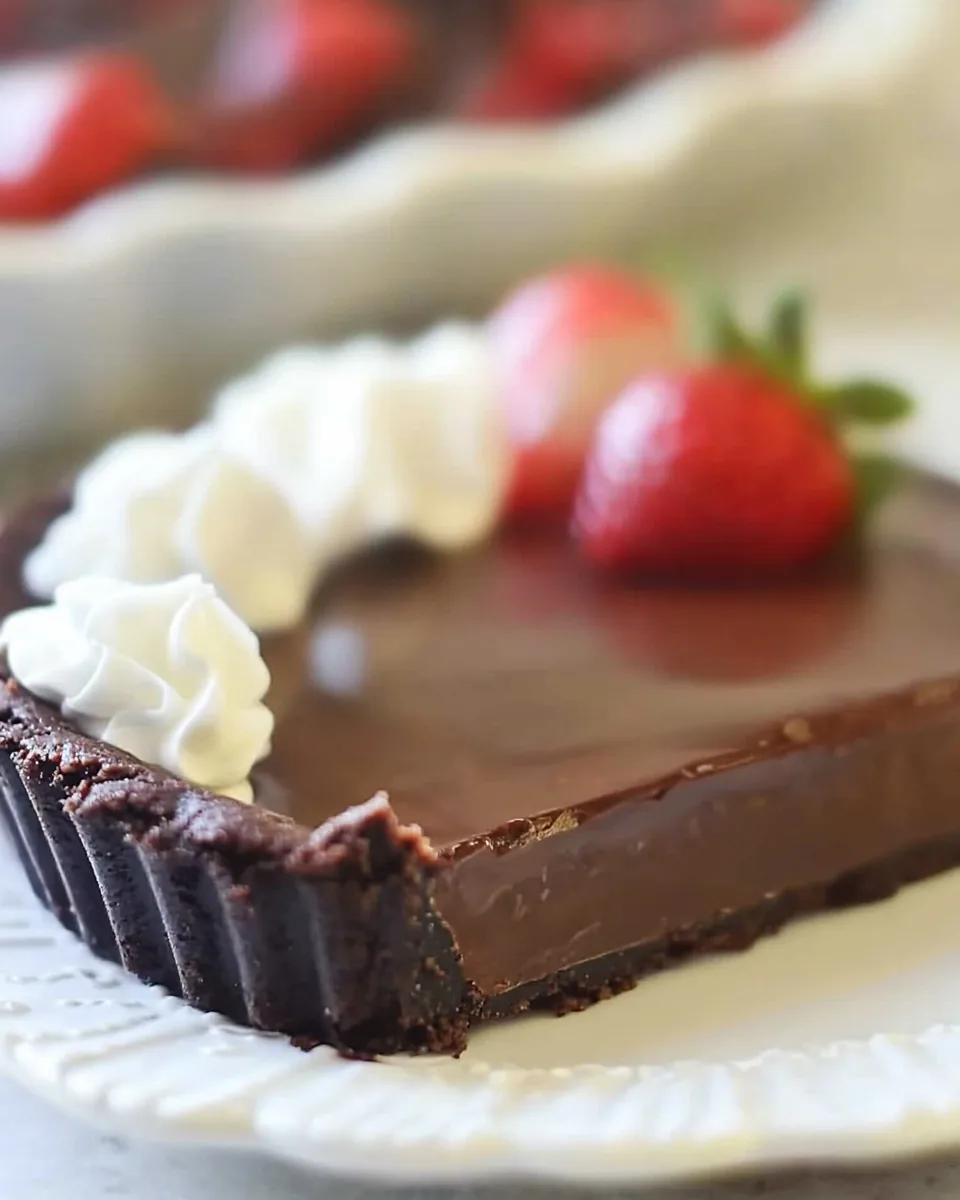
Glazed Chocolate Tart
There’s something truly magical about a Glazed Chocolate Tart. Just picture this: a special occasion, perhaps a family gathering or a cozy evening with friends, and you unveil this stunning dessert. The rich, decadent layers of chocolate, combined with that glossy glaze, will have everyone mesmerized. I remember the first time I made this tart; my friends were in awe as I sliced through the crust, revealing the luscious filling. Each bite is a delightful experience, marrying the crunch of the crust with the smoothness of the filling. It’s a dessert that not only satisfies a sweet tooth but also serves as a conversation starter. You might even find yourself making it for every celebration because it’s that good!
Recipe Snapshot
60 mins
0 mins
0 mins
Hard
350 kcal
3g g
Gluten-Free, Low FODMAP
22g g
Wooden Spoon, Frying Pan, Whisk, Baking Sheet, Large Pot, Oven
The Charm of This Glazed Chocolate Tart
Irresistibly Decadent
The Glazed Chocolate Tart stands out because it offers an indulgent experience. The layers of chocolate create a depth of flavor that is hard to resist. Each bite melts in your mouth, leaving you craving more. This dessert truly is the epitome of indulgence!
Visual Appeal
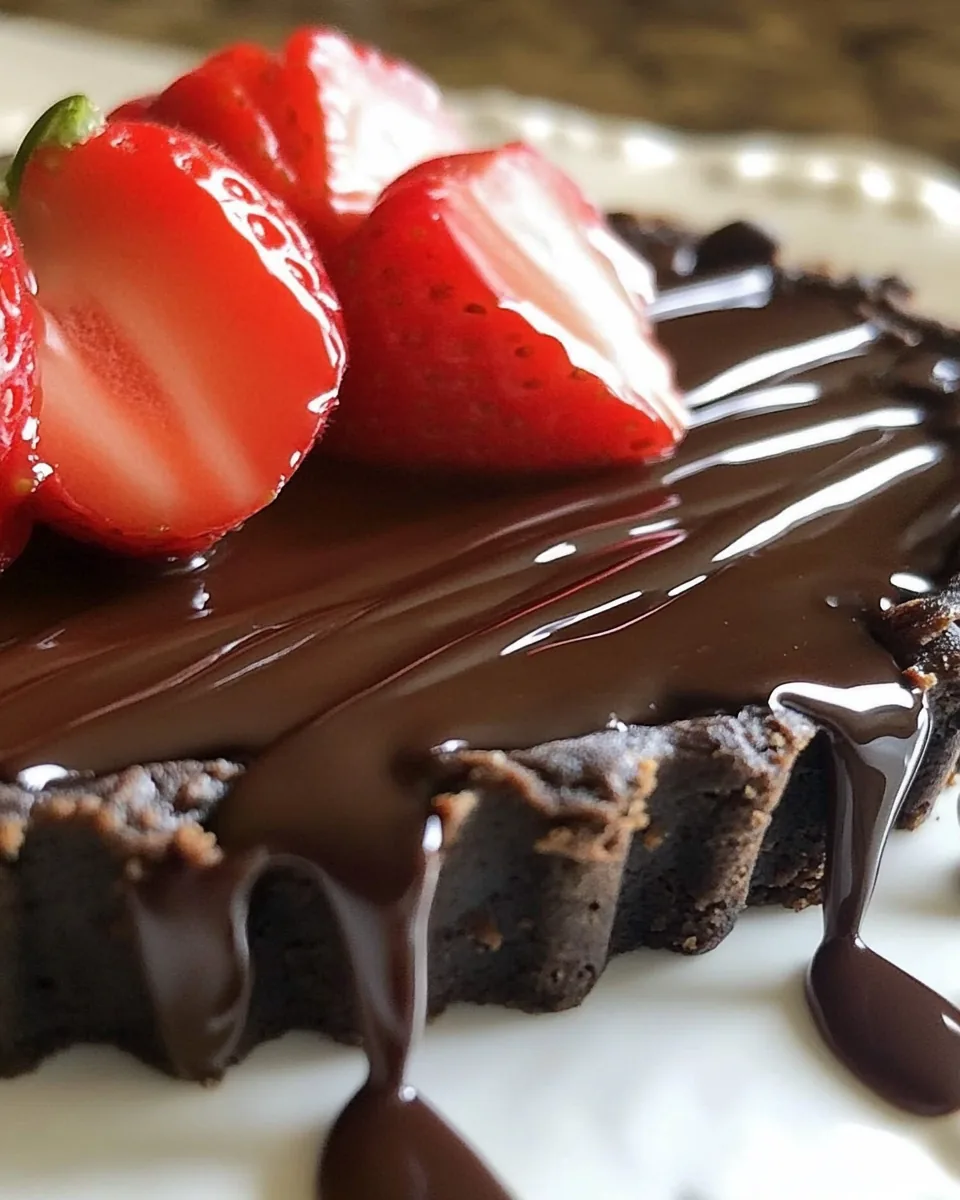
There’s no denying that the presentation of this tart is stunning. The shiny glaze catches the light beautifully, making it the star of the dessert table. It not only tastes amazing but also looks exquisite, which is perfect for impressing guests.
Simple Yet Elegant
What makes this recipe even more appealing is its simplicity. With just a few ingredients, you can create a dessert that tastes like it came from a high-end bakery. You don’t need to be a professional chef to pull off this masterpiece!
Perfect for Any Occasion
Whether it’s a birthday, anniversary, or just a weekend treat, the Glazed Chocolate Tart fits the bill. It’s versatile enough to be served at formal gatherings or casual dinners. Plus, it’s easy to slice and serve, making it a practical choice for entertaining.
Pairs Well with Sides
This tart is incredibly versatile when it comes to pairing. It can be served alongside fresh berries, whipped cream, or even a scoop of vanilla ice cream. These additions elevate the experience, complementing the chocolate without overpowering it.
Make-Ahead Friendly
If you’re planning a special event, the Glazed Chocolate Tart is perfect for making ahead of time. You can prepare it a day or two in advance, freeing up your schedule on the day of the celebration. Just keep it refrigerated until you’re ready to serve!
Ingredients to Make Glazed Chocolate Tart
When it comes to the ingredients for the Glazed Chocolate Tart, each one plays a crucial role in crafting the perfect balance of flavor and texture. The star of the show is, of course, the chocolate, which should be of high quality to ensure a rich taste. The crust, made from finely ground chocolate graham crackers, adds a delightful crunch, while butter and sugar enhance the overall sweetness. Together, these ingredients create a harmonious dessert that is both satisfying and elegant.
- Chocolate Graham Crackers: 9, finely ground (1 cup of crumbs) – These provide a deliciously sweet and chocolatey base for the tart, giving it both flavor and texture.
- Butter: 5 tablespoons, melted – Essential for binding the crust ingredients together, while also adding richness and flavor.
- Sugar: ¼ cup – This sweetens the crust and contributes to the overall balance of flavors in the tart.
The Process for Making Glazed Chocolate Tart
Creating a Glazed Chocolate Tart is an enjoyable experience that combines simple techniques with delicious ingredients. As you embark on this culinary journey, remember to savor each step and enjoy the aromatic bliss of baking. Let’s dive into the process!
- Preheat the oven to 350 degrees Fahrenheit. It’s crucial to get your oven ready first, as an even baking temperature will ensure your tart crust cooks consistently.
- To make the crust, combine the finely ground chocolate graham crackers, melted butter, and sugar in a bowl. Mix well until all the ingredients are combined and the mixture resembles wet sand.
- Press the crust mixture evenly onto the bottom and up the sides of a greased 9-inch tart pan. Use your fingers to ensure it’s compact and even, which will create a sturdy base for your tart.
- Bake the crust in the preheated oven for 10 minutes. This initial bake will set the crust, giving it a lovely golden brown color and firm texture.
- Once baked, allow the crust to cool on a rack for about 20 minutes. It’s important that the crust cools completely before adding the filling to prevent it from becoming soggy.
- To make the filling, bring cream to a boil in a saucepan over medium heat. The cream should bubble gently, signaling that it’s ready to be combined with the chocolate.
- Pour the hot cream over your chocolate in a bowl and let it stand for 5 minutes. This resting period allows the chocolate to melt perfectly, resulting in a smooth filling.
- After 5 minutes, gently stir the mixture until smooth. The texture should be silky and glossy, which indicates that it’s well combined.
- In another bowl, whisk together eggs, vanilla, and salt. This mixture adds richness and flavor to the filling.
- Now, stir the egg mixture into the melted chocolate, ensuring everything is well incorporated. The filling will be thick and luscious.
- Pour the filling into the cooled crust, spreading it evenly. The filling should almost reach the top of the crust, leaving just a little room for the glaze.
- Bake the tart until the filling is set about 3 inches from the edge but the center still jiggles, approximately 25 minutes. It will continue to cook slightly as it cools.
- To make the glaze, bring cream to a boil again and remove from heat. This step adds a decadent layer to your tart, enhancing its chocolate flavor.
- Stir in the chocolate until smooth, creating a rich and glossy glaze. You want it to be completely dissolved without any lumps.
- Add corn syrup and warm water to the glaze, stirring until well combined. This will give the glaze a beautiful sheen.
- Pour the glaze onto the tart, tilting and rotating it to cover the filling evenly. This technique ensures an even layer of glaze, enhancing the tart’s overall appearance.
- Let the tart stand until the glaze is set. The waiting time allows the glaze to firm up, making it easier to slice.
- Finally, remove the tart from the pan and place it on a serving platter. This is where the magic happens; your beautiful creation is ready to be enjoyed!
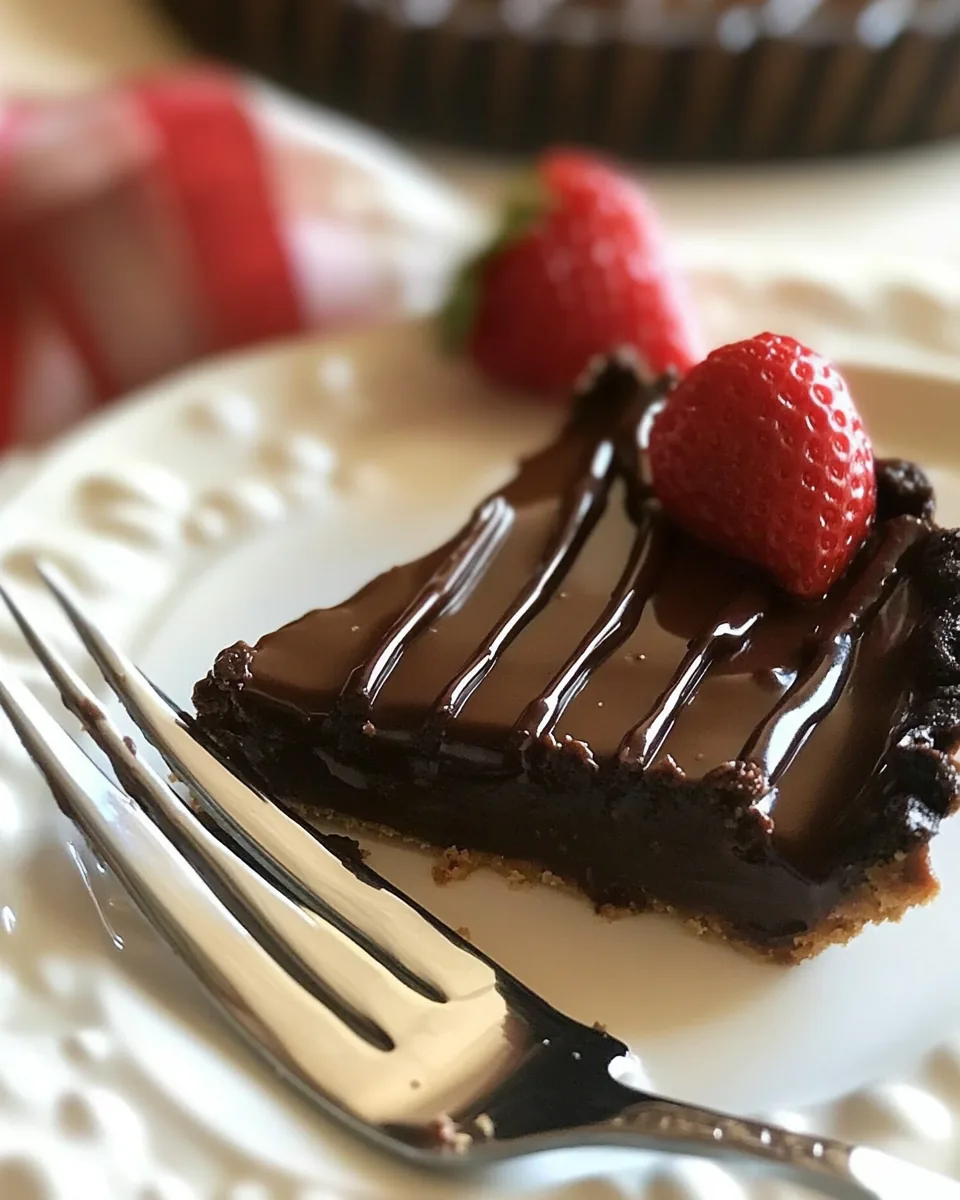
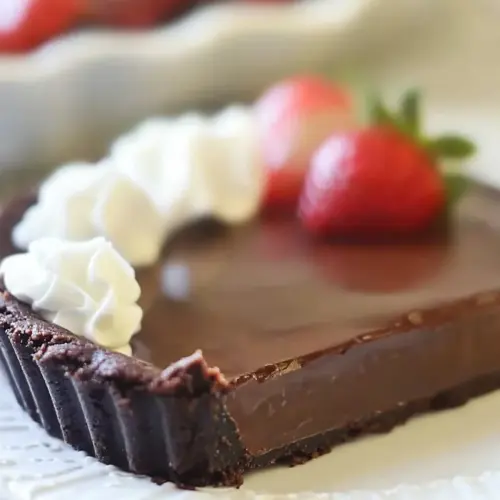
- Cut into wedges and serve with fresh berries and lightly sweetened whipped cream if desired. This adds a refreshing contrast to the rich chocolate.
Things Worth Knowing
- Don’t rush the cooling process: Allowing the crust to cool completely is vital to prevent sogginess in the tart.
- Quality ingredients matter: Using high-quality chocolate will significantly improve the flavor of your tart.
- Watch the baking time: Keep an eye on the tart while it bakes. It’s better for the center to remain slightly jiggly than to overbake it.
- Chilling overnight: For the best flavor, let the tart chill in the refrigerator overnight before serving. This allows the filling to set beautifully.
Make It Your Own
Every recipe can use a personal touch! Here are some tips to make the Glazed Chocolate Tart truly your own:
- Storage: Keep any leftovers in an airtight container in the refrigerator for up to three days.
- Freezing: You can freeze the tart before glazing for up to a month. Just make sure it’s well wrapped.
- Serving suggestions: Serve your tart with a dollop of whipped cream or alongside fresh berries for a burst of flavor.
- Flavor variations: Consider adding a splash of orange zest or a hint of espresso to the filling for a unique twist.
- Garnishing: Top with chocolate shavings or crushed nuts for added texture and visual appeal.
How to Serve Glazed Chocolate Tart
Serving your Glazed Chocolate Tart can be as delightful as making it! Here are some ideas to elevate your tart experience:
- With Fresh Berries: Serve alongside strawberries or raspberries to add a refreshing contrast to the rich chocolate.
- With Whipped Cream: A light dollop of whipped cream can balance the tartness and enhance the overall flavor profile.
- As a Celebration Dessert: This tart is perfect for birthdays, anniversaries, and holidays. It’s an elegant centerpiece for any gathering.
- Seasonal Pairings: Consider pairing with seasonal fruits, like strawberries in summer or pears in autumn, for unique flavor combinations.
- Tea or Coffee Pairing: The rich flavors of the tart make it a wonderful pairing with a cup of coffee or tea, enhancing the overall experience.
- Leftover Storage: If you have any slices left, store them covered in the fridge. They’re great for a quick dessert fix!
FAQ
Conclusion
The Glazed Chocolate Tart is an exceptional dessert that combines rich flavors with a stunning appearance. It’s perfect for any celebration and is sure to impress your guests with its luxurious taste. I encourage you to try making this tart; it’s easier than you might think and incredibly rewarding!
Glazed Chocolate Tart
Equipment
- Wooden Spoon
- Frying Pan
- Whisk
- Baking Sheet
- Large Pot
- Oven
Ingredients
- 1 cup Chocolate Graham Crackers finely ground
- 5 tablespoons Butter melted
- ¼ cup Sugar
Instructions
- Preheat the oven to 350 degrees Fahrenheit.
- To make the crust, combine the finely ground chocolate graham crackers, melted butter, and sugar in a bowl. Mix well until all the ingredients are combined and the mixture resembles wet sand.
- Press the crust mixture evenly onto the bottom and up the sides of a greased 9-inch tart pan. Use your fingers to ensure it’s compact and even.
- Bake the crust in the preheated oven for 10 minutes. This initial bake will set the crust.
- Once baked, allow the crust to cool on a rack for about 20 minutes.
- To make the filling, bring cream to a boil in a saucepan over medium heat.
- Pour the hot cream over your chocolate in a bowl and let it stand for 5 minutes.
- After 5 minutes, gently stir the mixture until smooth.
- In another bowl, whisk together eggs, vanilla, and salt.
- Now, stir the egg mixture into the melted chocolate, ensuring everything is well incorporated.
- Pour the filling into the cooled crust, spreading it evenly.
- Bake the tart until the filling is set about 3 inches from the edge but the center still jiggles, approximately 25 minutes.
- To make the glaze, bring cream to a boil again and remove from heat.
- Stir in the chocolate until smooth, creating a rich and glossy glaze.
- Add corn syrup and warm water to the glaze, stirring until well combined.
- Pour the glaze onto the tart, tilting and rotating it to cover the filling evenly.
- Let the tart stand until the glaze is set.
- Finally, remove the tart from the pan and place it on a serving platter.
- Cut into wedges and serve with fresh berries and lightly sweetened whipped cream if desired.