Crème Brûlée Cookies
I can still remember the first time I tasted Crème Brûlée Cookies. It was at a friend’s holiday party, and as I took my first bite, I was immediately captivated by the sweet, creamy flavor and the satisfying crunch of the caramelized sugar on top. The combination of textures was nothing short of magical, and I knew I had to recreate this delightful dessert at home. These cookies blend the rich flavors of classic crème brûlée with the comforting familiarity of a cookie, making them perfect for any occasion. Whether it’s a festive gathering or simply a cozy evening at home, these cookies will surely impress.
What I love most about making Crème Brûlée Cookies is the versatility they offer. You can whip them up for a special occasion or indulge in them on a quiet night with a cup of tea. The process itself is quite fun, especially when it comes to the crème brûlée topping. It’s like a mini culinary show every time I use the kitchen torch, watching the sugar melt and transform into a beautiful, golden crust. If you’ve never tried making these at home, you’re in for a treat!
These cookies are not only a feast for the senses but also a delightful way to impress guests. Their elegant appearance, combined with an irresistible flavor profile, makes them stand out at any dessert table. Trust me, once you serve them, you’re bound to receive compliments and requests for the recipe. So, why not dive in and bring this unique twist on a classic dessert to life? Your taste buds will thank you!
Recipe Snapshot
29 mins
20 mins
9 mins
Medium
150 kcal
1 g
Gluten-Free, Low FODMAP
7 g
Stand Mixer Fitted with a Paddle Attachment, Two Tablespoon Cookie Scoop, Baking Sheet, Kitchen Torch
Why This Crème Brûlée Cookies Hits Different
Delightfully Decadent
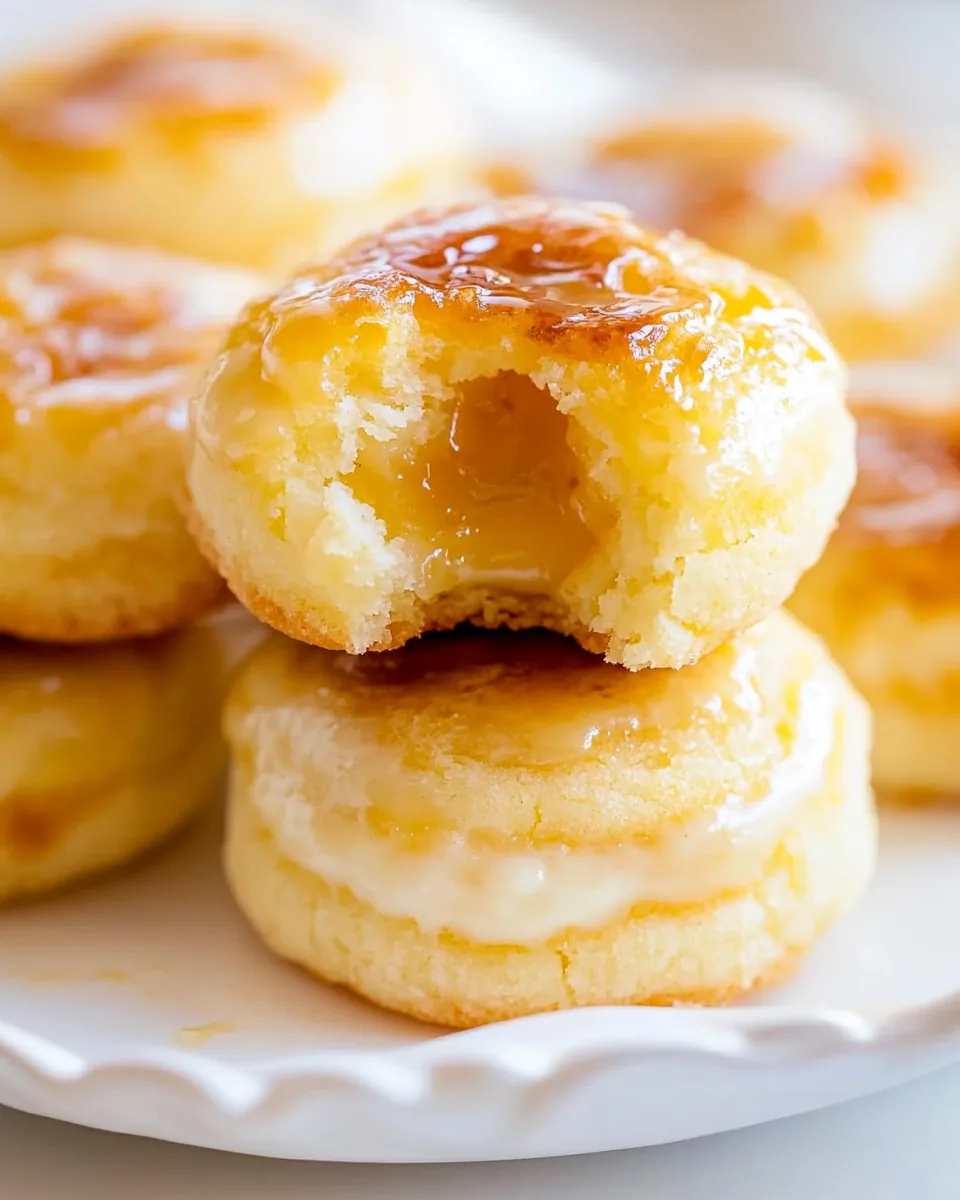
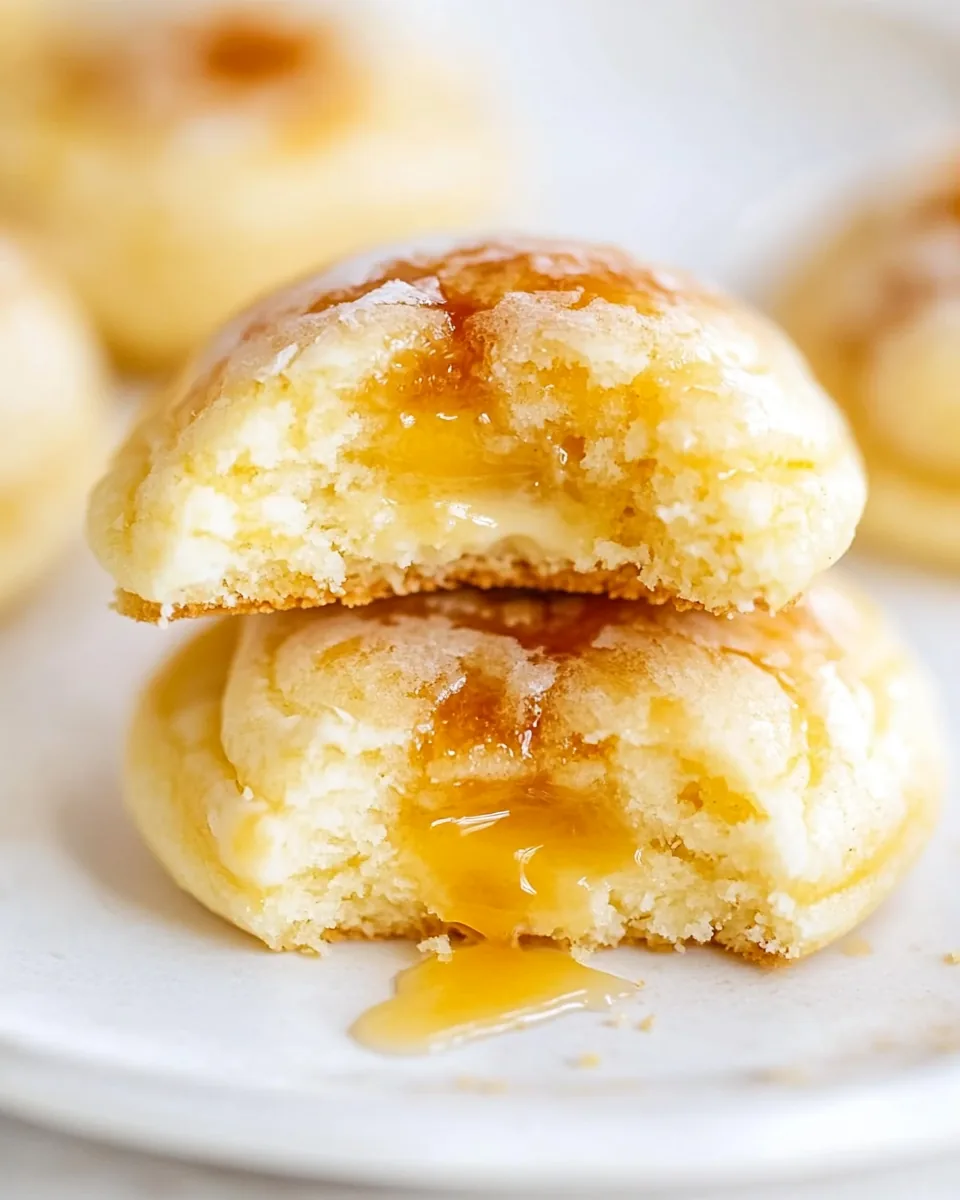
The best part of making Crème Brûlée Cookies is the rich flavor and texture. Each bite is a harmonious blend of creamy sweetness and a satisfying crunch, reminiscent of the classic dessert. You get the best of both worlds: a cookie’s comforting nature and the luxurious experience of crème brûlée.
Show-Stopping Presentation
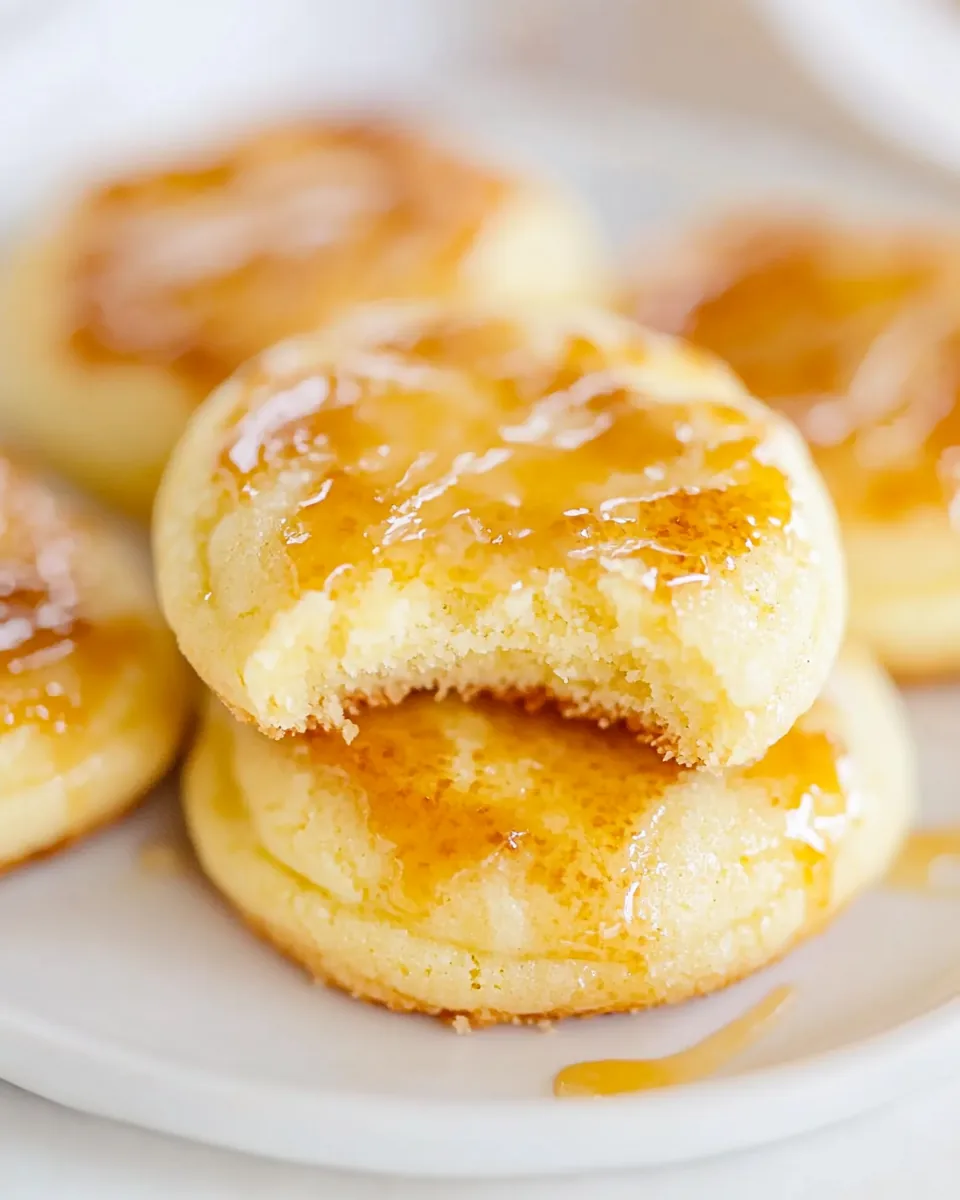
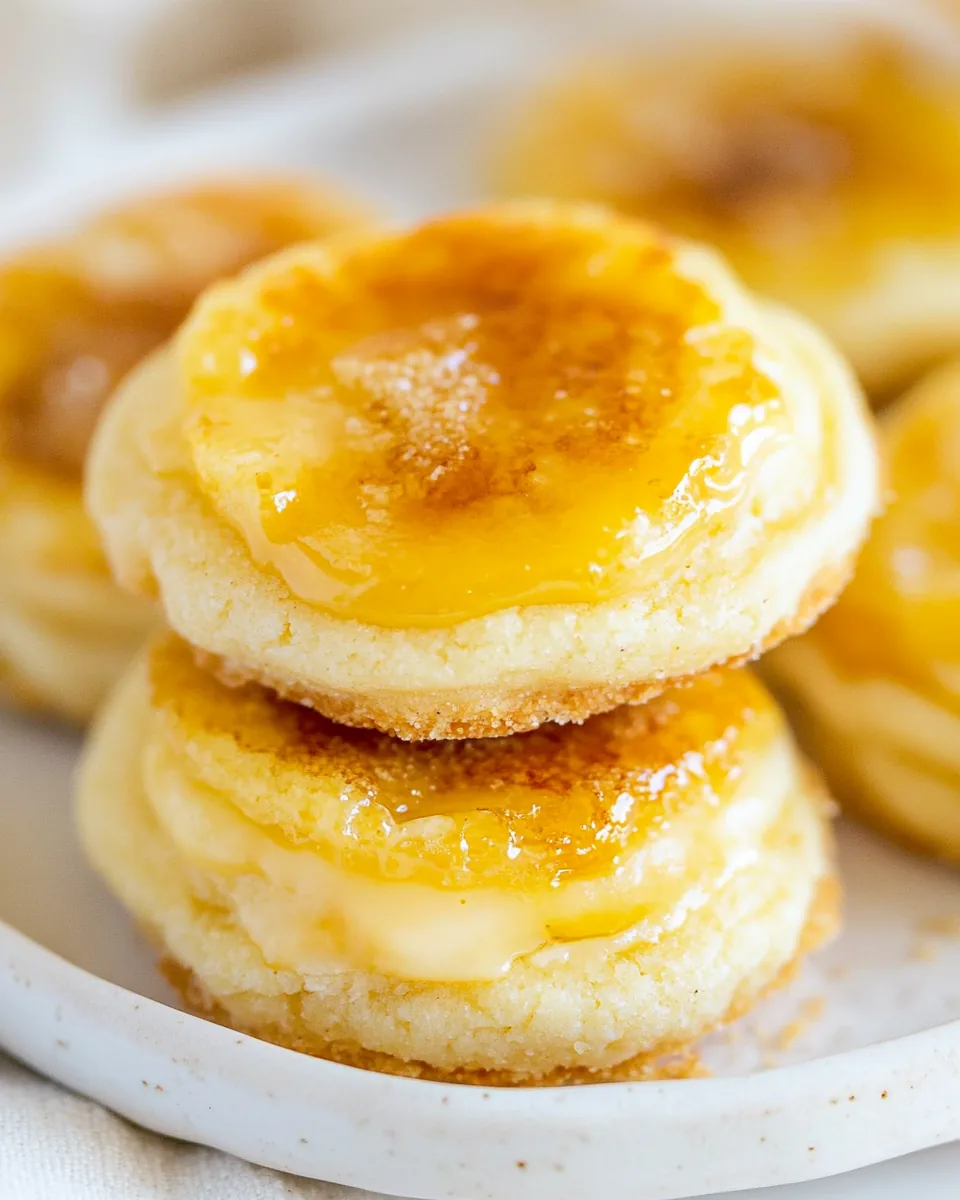
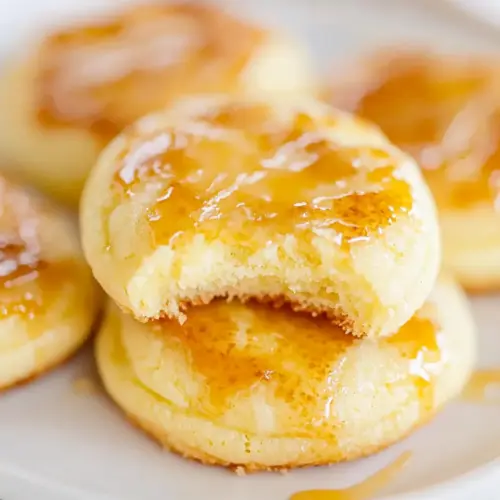
When serving Crème Brûlée Cookies, the visual appeal is just as important as the taste. The golden, caramelized sugar topping creates a beautiful contrast against the soft, pale cookie base. It’s a dessert that not only tastes incredible but looks stunning on any dessert platter!
Fun to Make
Using a kitchen torch to caramelize the sugar on top is a thrilling experience. It adds an interactive element to your baking, allowing you to get hands-on with the process. It’s a fantastic opportunity to share the fun of cooking with family or friends, making the baking experience even more special.
Versatile Dessert Option
These cookies can easily adapt to different occasions. You could dress them up for a fancy dinner party or enjoy them with a casual cup of coffee. They also make for a delightful gift when packaged beautifully, adding a personal touch to your thoughtful gesture.
Perfect for Any Season
Unlike many desserts that are tied to specific holidays or seasons, Crème Brûlée Cookies are suitable for all year round. Whether it’s a bright summer afternoon or a chilly winter evening, these cookies can elevate any moment.
Kid-Friendly Fun
Getting kids involved in making Crème Brûlée Cookies can be a delightful experience. They can help with mixing, shaping the dough, and even sprinkling sugar for the brûlée topping. It’s a great way to bond while creating something delicious together!
Crème Brûlée Cookies Shopping List
The beauty of Crème Brûlée Cookies lies not only in their taste but also in the simplicity of their ingredients. Each component plays a vital role in achieving that creamy, sweet experience we all crave. The combination of cream cheese and butter provides a wonderful richness, while the granulated sugar and confectioners’ sugar create the perfect sweetness. Together, they form a delightful balance that makes these cookies truly irresistible.
- ½ cup unsalted butter – This adds a rich, creamy flavor and soft texture to the cookies.
- ½ cup canola or vegetable oil – Helps keep the cookies moist and tender.
- ½ cup granulated sugar – Sweetens the dough and contributes to the cookie’s perfect texture.
- ½ cup confectioners’ sugar – Adds sweetness and a light texture to the cookies.
- 1 large egg – Binds the ingredients together while adding moisture.
- 1 teaspoon vanilla extract – Enhances the overall flavor profile.
- 1 teaspoon almond extract – Imparts a delightful, nutty depth to the cookies.
- 2 ¼ cups all-purpose flour – The backbone of the cookies, providing structure.
- ½ teaspoon baking soda – Helps the cookies rise, creating a soft texture.
- ½ teaspoon cream of tartar – Stabilizes the dough and contributes to the cookie’s soft chew.
- ½ teaspoon salt – Balances the sweetness and enhances the flavors.
- 1 8-ounce block cream cheese, softened – Adds creaminess and a unique flavor to the frosting.
- 6 tablespoons unsalted butter, softened – Used in the frosting for extra richness.
- 2 ½ to 3 cups confectioners’ sugar, or as desired – For sweetness in the frosting.
- granulated sugar, about 1/2 to 1 teaspoon per cookie – Used for the brûlée topping.
Making Crème Brûlée Cookies
Creating these Crème Brûlée Cookies is a journey that starts with gathering your ingredients and tools. The process is straightforward and allows you to enjoy the delightful aroma of freshly baked cookies wafting through your kitchen. Follow the steps carefully, and you’ll be rewarded with a batch of delicious cookies that are sure to impress!
- To the bowl of a stand mixer fitted with the paddle attachment, add the unsalted butter, canola oil, granulated sugar, and confectioners’ sugar. Beat on medium-high speed until the mixture is creamed and well combined, about 4 minutes. You want it to be light and fluffy, with a pale color that indicates it’s well-mixed.
- Add the egg, vanilla extract, and almond extract to the bowl. Beat this mixture until it’s fully combined, ensuring that all the wet ingredients are well integrated into the butter and sugar mixture.
- Next, add in the all-purpose flour, baking soda, cream of tartar, and salt. Beat on low speed until just combined. You’ll want to stop mixing as soon as you no longer see dry flour to avoid overworking the dough, which can make the cookies tough.
- Using a 2-tablespoon cookie scoop or your hands, form approximately 20 equal-sized mounds of dough. Roll them into balls and flatten them about halfway. This gives the cookies a nice, uniform shape.
- Place the mounds on a large plate or tray, cover with plastic wrap, and refrigerate for at least 2 hours, or up to 7 days. This chilling step is crucial; it helps the cookies maintain their shape during baking and prevents them from spreading too much.
- Preheat your oven to 350°F (175°C). Line a baking sheet with parchment paper or a Silpat mat, or lightly spray it with cooking spray for easy removal of the cookies.
- Once the oven is preheated, place the chilled dough mounds on the baking sheet, spaced at least 2 inches apart. I usually use a half-sheet pan and bake about 8 cookies per sheet to ensure they bake evenly.
- Bake for about 8 minutes. Keep an eye on them; you want the edges to be set while the tops remain slightly undercooked, pale, and glossy in the center. They will firm up as they cool, so don’t worry if they’re a bit soft in the middle.
- After baking, allow the cookies to cool on the baking sheet for a few minutes before transferring them to a wire rack. I often let them cool on the baking sheet itself, as this helps them firm up without needing a rack.
- While the cookies are cooling, prepare the frosting. In the bowl of a stand mixer fitted with the paddle attachment, add the cream cheese and unsalted butter. Beat on medium-high speed until they are creamed and fluffy, about 2 minutes.
- Add 2 ½ cups of confectioners’ sugar to the mixture and beat to incorporate. If needed, you can add more sugar to achieve your desired frosting consistency, especially if you prefer a thicker frosting.
- Once the cookies have cooled, spread about 2 to 3 teaspoons of frosting on top of each cookie, using a knife to smooth it out evenly.
- Sprinkle each cookie with about 1/2 to 1 teaspoon of granulated sugar. This will form the delicious brûlée topping.
- Using a kitchen torch, carefully brûlée the sugar on all the cookies. It will only take about 2 to 3 seconds per cookie to achieve that beautiful, caramelized crust. Take care not to hold the flame too long, as you want a crisp top without burning it.
- Serve the cookies immediately for the best texture and flavor. Enjoy your delightful creations!
Things Worth Knowing
- Chilling the Dough: Always chill your dough for the best results. This prevents the cookies from spreading too much during baking, ensuring they maintain their shape.
- Checking for Doneness: Cookies might look slightly underbaked when you take them out. They will continue to firm up as they cool on the baking sheet, so don’t overbake.
- Using a Kitchen Torch: When brûléeing the sugar, keep the torch moving to prevent burning. It’s essential to achieve that perfect golden crust without darkening the sugar too much.
- Frosting Consistency: If your frosting is too thick, add a little milk to loosen it. If it’s too thin, simply add more confectioners’ sugar until you reach your desired texture.
Ways to Customize
If you’re looking to make your Crème Brûlée Cookies even more special, there are plenty of ways to customize them! Here are some ideas to inspire your creativity:
- Flavor Variations: Experiment with different flavors by adding citrus zest, such as lemon or orange, to the cookie dough for a refreshing twist.
- Chocolate Chips: Consider folding in some chocolate chips for a delicious textural contrast and added richness.
- Nutty Additions: Try adding chopped nuts such as pecans or almonds to the cookie dough for crunch.
- Different Toppings: Instead of a classic brûlée topping, you can drizzle the cookies with melted chocolate or a salted caramel sauce for a unique flair.
- Seasonal Spices: Incorporate seasonal spices like cinnamon or nutmeg into the dough for a cozy flavor profile, especially during the holidays.
- Frosting Flavors: You can also try different frosting flavors, such as adding a bit of cocoa powder to create a chocolate cream cheese frosting.
- Try Different Shapes: Use cookie cutters to create fun shapes instead of round cookies. This can add a playful element, especially for themed occasions.
How to Serve Crème Brûlée Cookies
When it comes to serving your Crème Brûlée Cookies, presentation is key. Here are some ideas to consider:
- Elegant Dessert Plate: Arrange the cookies neatly on a beautiful dessert plate, and garnish with fresh berries for a pop of color.
- Accompanying Beverages: Serve these cookies with a hot cup of coffee or tea. The warm beverages enhance the flavors and provide a comforting experience.
- Special Occasions: These cookies make a fantastic addition to holiday dessert tables, birthday parties, or wedding receptions, showcasing their versatility.
- Storage Suggestions: If you have leftovers, store them in an airtight container at room temperature for up to 5 days. They can also be refrigerated, though they may dry out a bit.
- Freezing Options: If you want to prepare in advance, the unbaked cookie dough can be frozen for up to 4 months. Simply thaw and bake when ready to enjoy!
- Creative Plating: Consider serving the cookies on a wooden board with a variety of toppings on the side, allowing guests to customize their experience.
- Seasonal Pairings: Pair these cookies with seasonal fruits or sorbets to complement their rich flavor, creating a delightful contrast.
FAQ
Conclusion
Crème Brûlée Cookies are a delightful combination of rich flavors and textures that truly elevate the classic cookie experience. They’re perfect for any occasion, whether you’re celebrating a special event or simply indulging yourself. So go ahead, gather your ingredients, and try making these incredible cookies at home. They’re sure to be a hit!
Crème Brûlée Cookies
Equipment
- Stand Mixer Fitted with a Paddle Attachment
- Two Tablespoon Cookie Scoop
- Baking Sheet
- kitchen torch
Ingredients
- ½ cup unsalted butter
- ½ cup canola or vegetable oil
- ½ cup granulated sugar
- ½ cup confectioners’ sugar
- 1 large egg
- 1 teaspoon vanilla extract
- 1 teaspoon almond extract
- 2 ¼ cups all-purpose flour
- ½ teaspoon baking soda
- ½ teaspoon cream of tartar
- ½ teaspoon salt
- 1 8-ounce block cream cheese, softened
- 6 tablespoons unsalted butter, softened
- 2 ½ to 3 cups confectioners’ sugar, or as desired
Instructions
- To the bowl of a stand mixer fitted with the paddle attachment, add the unsalted butter, canola oil, granulated sugar, and confectioners’ sugar. Beat on medium-high speed until creamed and combined, about 4 minutes.
- Add the egg, vanilla extract, and almond extract, and beat until combined.
- Add the all-purpose flour, baking soda, cream of tartar, and salt, and beat on low speed until just combined.
- Using a 2-tablespoon cookie scoop, or your hands, form approximately 20 equal-sized mounds of dough, roll into balls, and flatten about halfway.
- Place mounds on a large plate or tray, cover with plastic wrap, and refrigerate for at least 2 hours, up to 7 days.
- Preheat oven to 350°F (175°C). Line a baking sheet with a Silpat or spray with cooking spray.
- Place dough mounds on baking sheet, spaced at least 2 inches apart.
- Bake for about 8 minutes or until edges have set and tops are just set, even if slightly undercooked.
- Allow cookies to cool on baking sheet before frosting.
- To the bowl of a stand mixer, add the cream cheese and unsalted butter, and beat on medium-high speed until creamed and fluffy, about 2 minutes.
- Add 2 ½ cups confectioners’ sugar and beat to incorporate. If necessary, add additional confectioners’ sugar to achieve desired frosting consistency.
- Add about 2 to 3 teaspoons frosting to the top of each cookie, spreading with a knife to smooth it.
- Sprinkle each cookie with about 1/2 to 1 teaspoon granulated sugar.
- Using a kitchen torch, brûlée the sugar on all the cookies. It will only take about 2 to 3 seconds per cookie. Serve immediately.
Notes
- Storage: I am comfortable storing frosted cookies at room temperature for up to 5 days, but if you’re not, store them in the fridge noting they will be more prone to drying out.
- Freezing: Unbaked cookie dough can be stored in an airtight container in the refrigerator for up to 7 days, or in the freezer for up to 4 months. If baking straight from freezer, you don’t have to thaw it.
- Extra frosting: will keep airtight for at least 2 weeks in the fridge.